Open an Agreement (Mobile App)

Use the mobile app to open a loaner, rental, or test drive agreement from scratch, from a customer record, from an appointment, or from an agreement pending unit assignment or inspection.

How to Open an Agreement on Mobile

The open agreement process is broken up into sections to help smoothly guide you through the steps, from filling in customer information to capturing a signature.

Quick Steps Full Walkthrough

Quick Steps

1

Tap Open, then scan the customer's driver's license or search for their record.

2

Fill in the Customer Profile (contact info and driver's license) and tap Save.

3

Fill in any other sections that apply: Insurance, Credit Card, Customer VIN, Delivery/Collection, Additional Drivers.

4

Add a unit, including service details, scheduling, rates, and unit details.

5

Review charges, fees, and taxes. Tap any line item to edit, if allowed.

6

Inspect the unit: photograph each zone and mark any damage.

7

Tap Open and collect a signature (electronic, print, email, or text).

Full Walkthrough

1. Scan or Search (from the Home Screen)

ClosedOption 1: Scan a Driver's License / Search or Walkup.
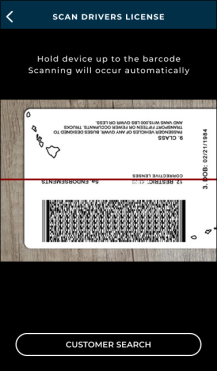
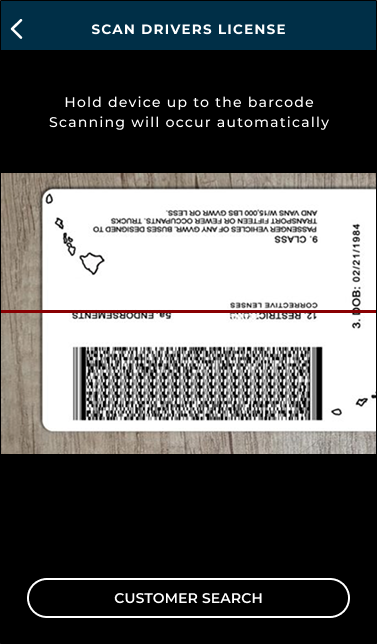
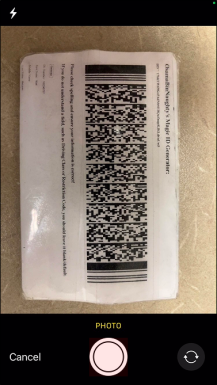
  1. Tap Open. Your camera opens automatically. You have the following options:
    • Scan a driver's license. The app will use an existing customer record with the same license number and state, or start a new agreement with the scanned information (name, license number, date of birth, address).
    • Scan a driver's license (Photo or Scan, depending on settings)

      Note about conflicting customer information: Read more: ClosedIf a customer record contains conflicting information from the driver's license, such as a different name, address, or date of birth, the scanned information is used and the existing customer record is updated based on the scan: First and last name (and middle name, if present), date of birth, and driver's license number, expiration, state, and country.
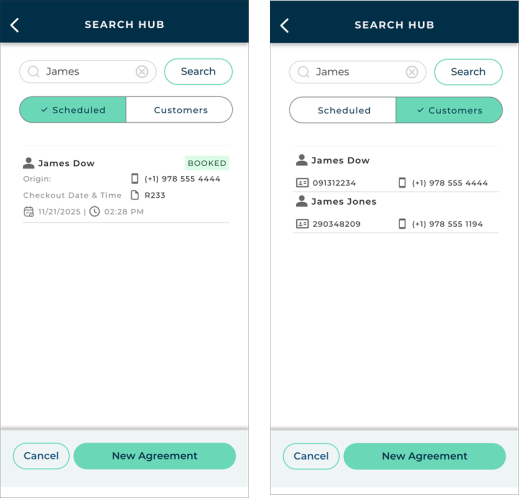
    • Search for the customer. Tap CUSTOMER SEARCH to exit the scanner and manually look up the customer by name or driver's license number on the Search Hub. Results are broken up into two separate tabs: Customers, for customer records, and Scheduled, for scheduled appointments for the customer. Select the customer to begin the open process.
    • Open a walkup. Tap CUSTOMER SEARCH to exit the scanner and tap  New Agreement.

    Search for a customer record or scheduled appointment

ClosedOption 2: Start from an appointment, available unit, or pending agreement (on the Dashboard).
  1. Tap Today's Appointments, Available Units, or Open Pending.
  2. Select the record you want to use to begin the open process (e.g., an appointment, an available unit, or an open pending agreement. Use the search feature, as needed, to narrow results.
  3. If selecting a unit, you can choose to scan the customer's driver's license, search for a customer, or continue with a walkup. The unit will already be assigned to the agreement with unit details filled in.
  4. Select the agreement type (e.g., Loaner, Rental, or Test Drive), if applicable.
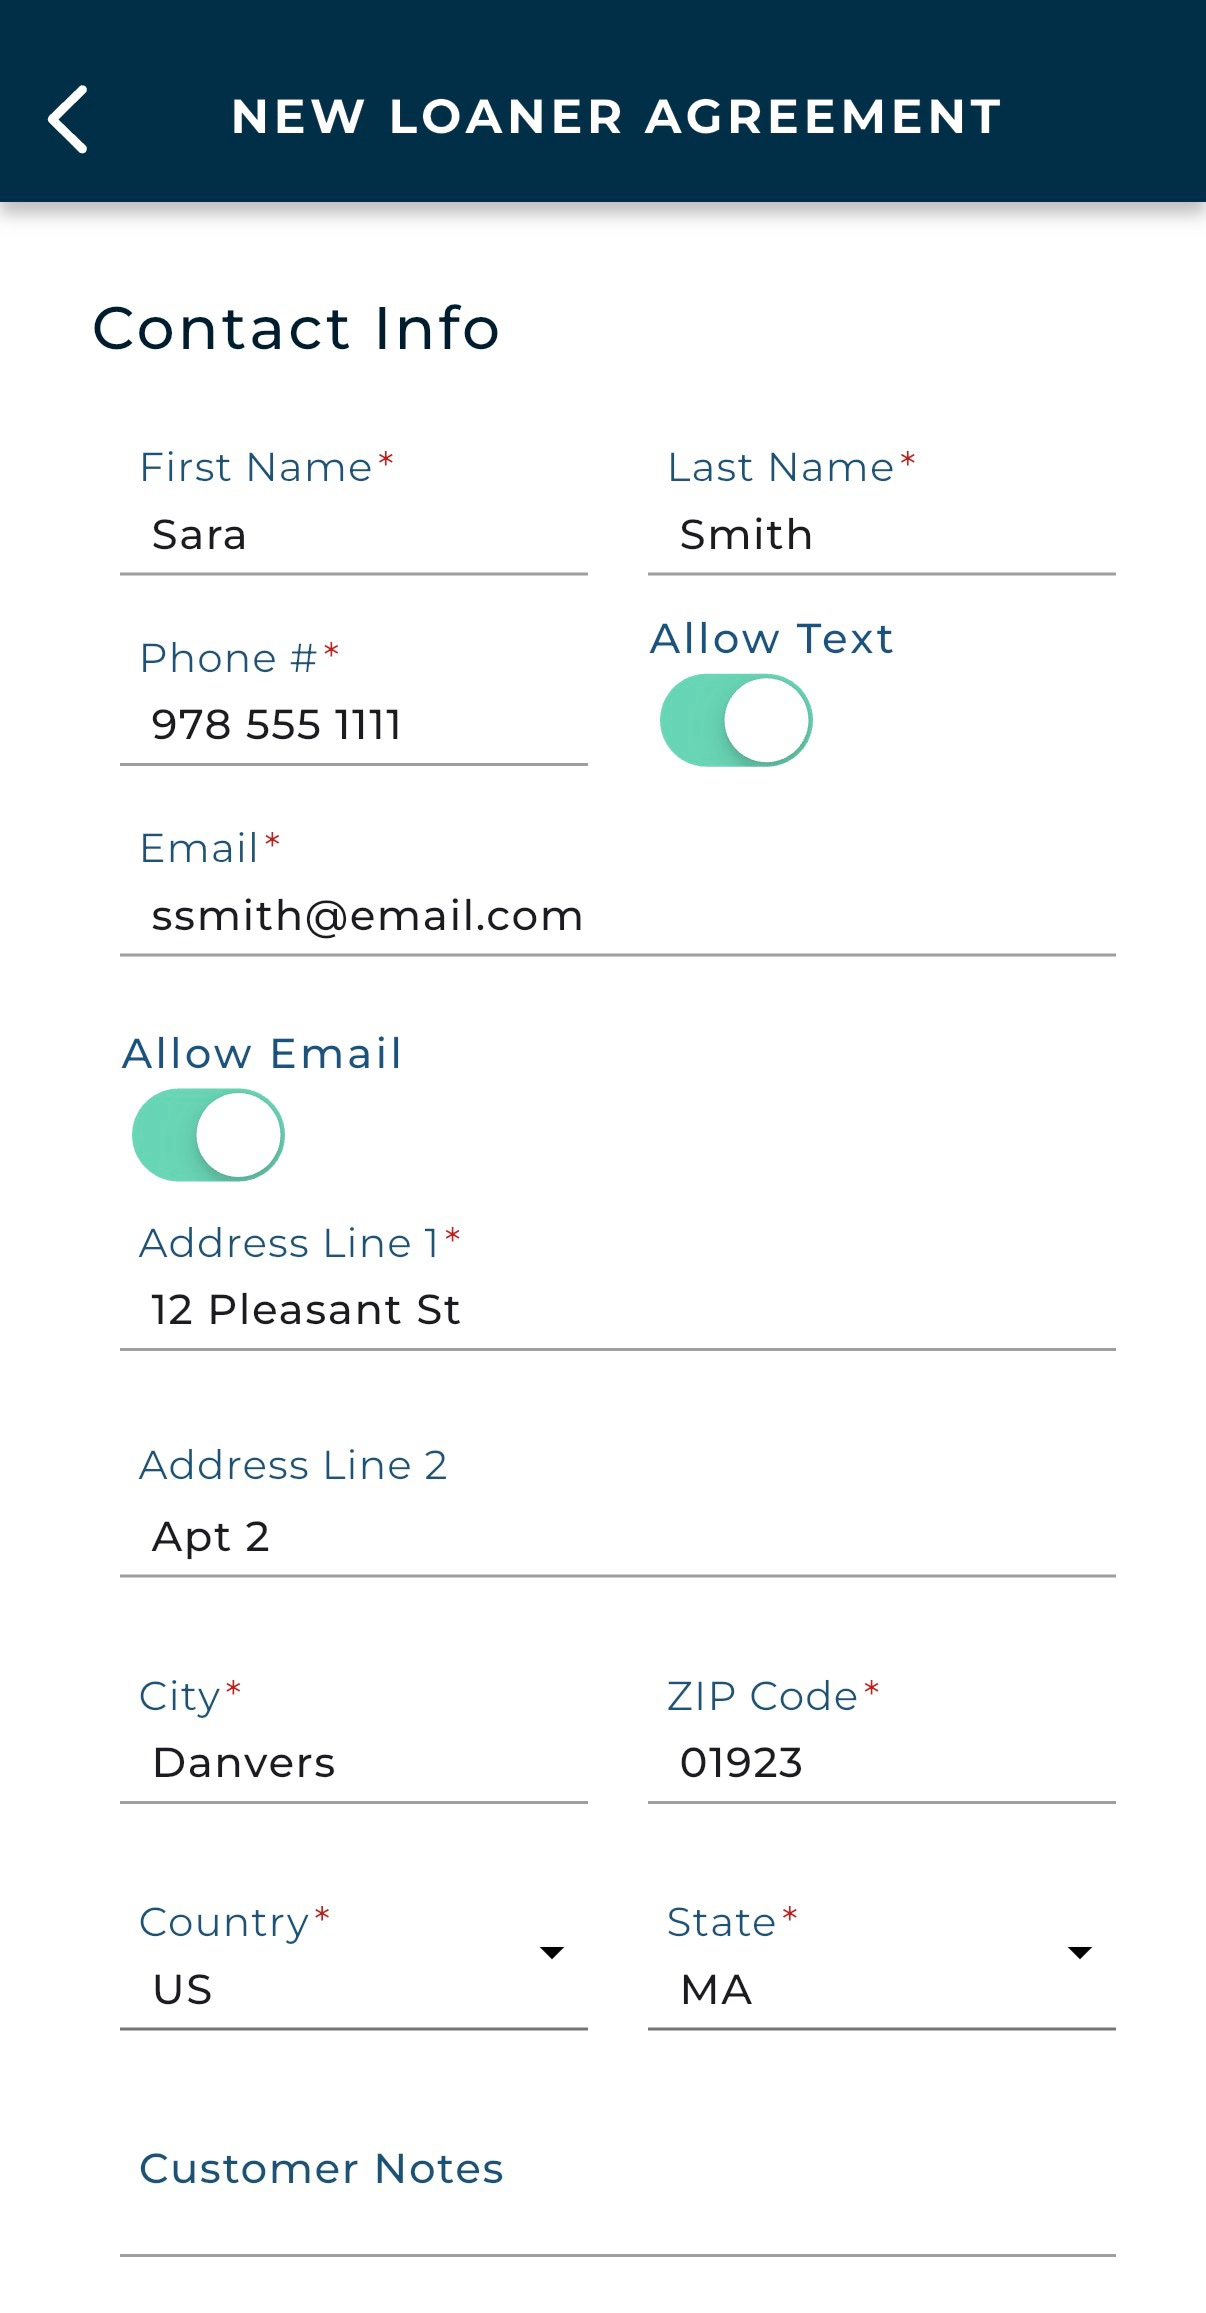
  5. Fill in Contact Info as part of the customer profile. Tap Save.

2. Complete Customer Profile Information

After you begin the agreement process, you are brought directly to the Customer Profile section.

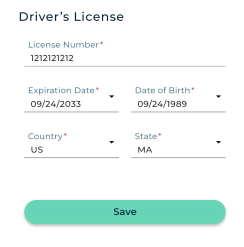
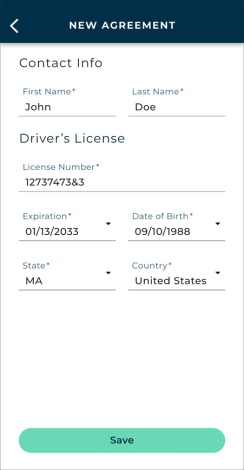
This section consists of customer record information, including contact information (name, phone #, email, address, customer communication language, if applicable, and notes) and driver's license (license number, expiration date, date of birth, country, and state).

When you're finished with this section, tap Save.

3. Fill in Additional Customer Information

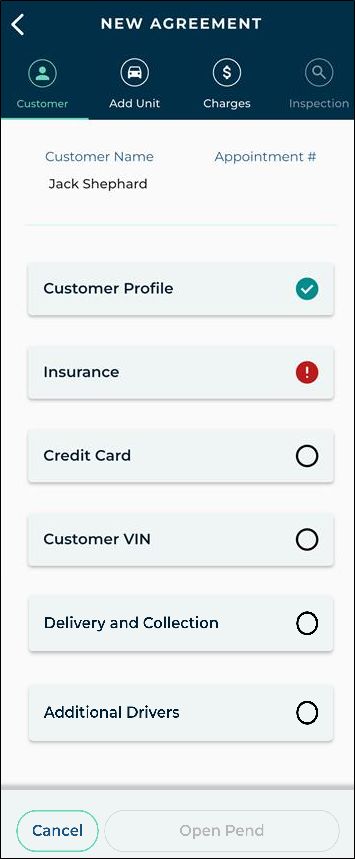
The Customer stepper of the agreement consists of several sections.

A section with required information still needing completion is marked (). After you fill in all required fields in a section, it is marked as completed ().


Hover to view the full-sized image.

Customer ProfileClosed

If you scanned a driver's license or used a customer record to open this agreement, this section is already completed (). If you need to view or change anything, tap the section.

This section consists of customer record information, including contact information (name, phone #, email, address, customer communication language, if applicable, and notes) and driver's license (license number, expiration date, date of birth, country, and state).

When you're finished with this section, tap Save.

Insurance InformationClosed

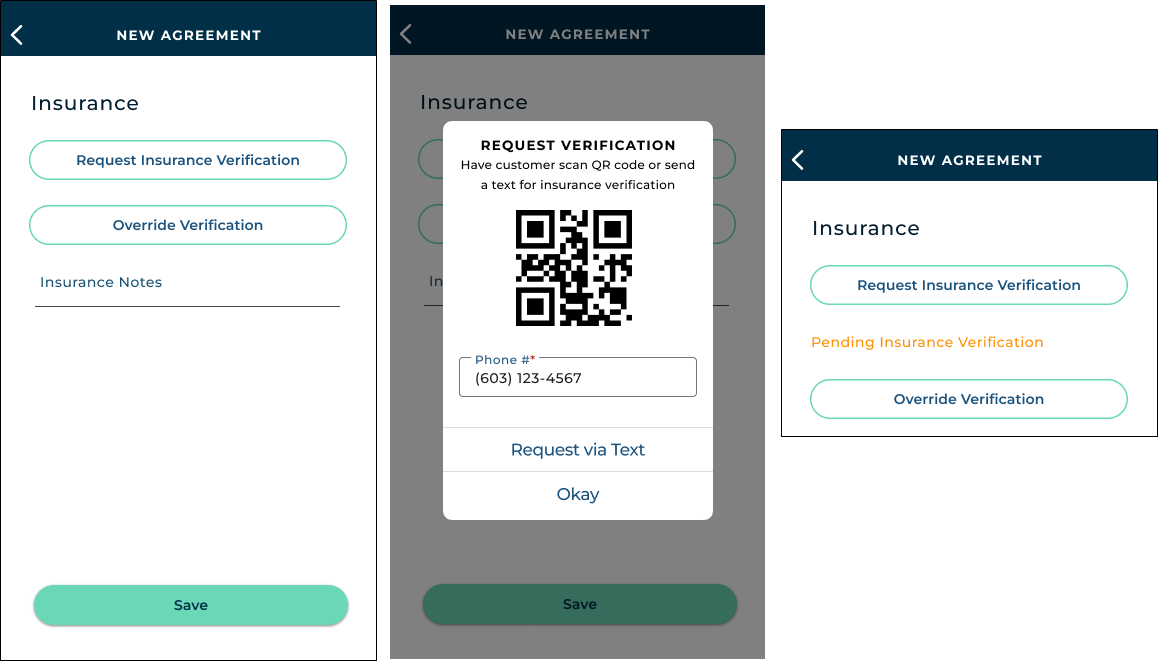
Integration availability: If your location uses Insurance Verification integration, you can Request Insurance Verification to text a link or have the customer scan a QR code to begin the insurance verification process. (This may be required, based on your settings, but an override option may be available to bypass this requirement.) Learn more.

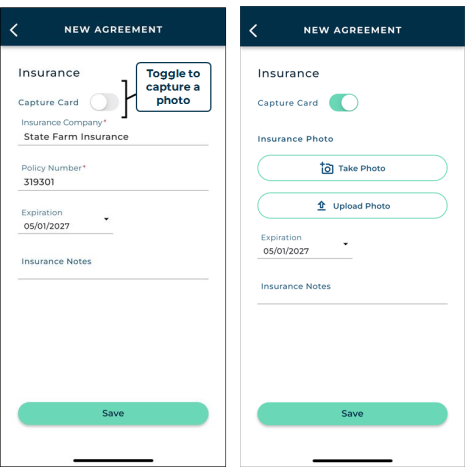
This section consists of the customer's automobile insurance information, including Insurance Company, Policy Number, Expiration, and Insurance Notes.

A Capture Card toggle is available to take or upload a photo of the customer's insurance card instead of filling in the Company and Policy Number. The photo is present even if Capture Card is toggled off, but a Delete Photo button is available to remove the image.

When you're finished with this section, tap Save.

Credit CardClosed

If your location uses integrated Credit Card Processing for agreement charges and/or tolls / violations, this section consists of options to capture a credit card for future payment. See "Credit Card Processing" in this topic for more details.

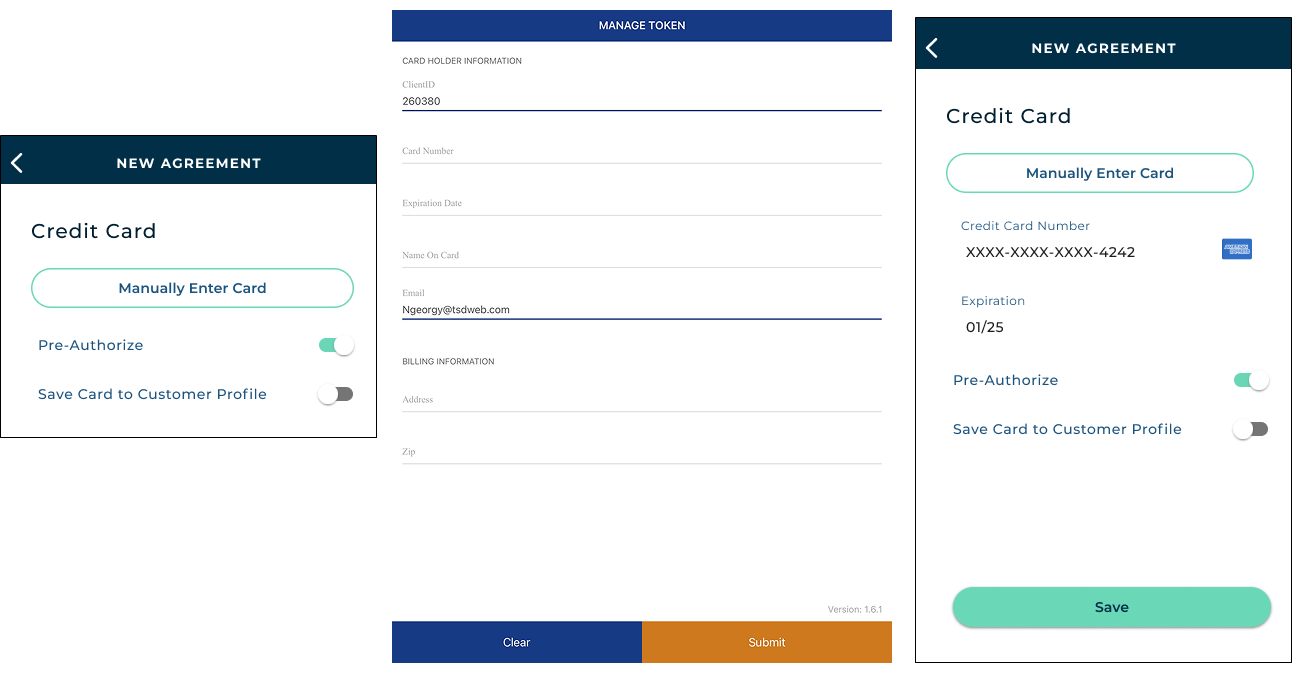
  • Capture a credit card for future payment. Depending on your provider, you can do so with a supported card reader device, by scanning a credit card with your mobile device, or by manually filling in credit card information. Capturing a card may be required, based on your settings.
  • Replace a previously captured card. If a card has already been captured on the agreement and no card reader is paired, tap Capture Card (or Manually Enter Card, for CenPOS) to clear the existing entry and manually fill in new card details. If you navigate away without entering a new card, the original card remains on the agreement.
  • Pre-authorize a captured credit card to hold funds. If pre-authorizations are configured for your location's integration, tap Pre-Authorize to have a pre-authorization taken against the card at save.
  • Save the captured card to the customer's profile for next time. Tap Save Card to Customer Profile .
  • Bill potential tolls / violations to the captured card. Tap Charge Violations to Customer . If toggled off, these will be billed to your location.

Customer VINClosed

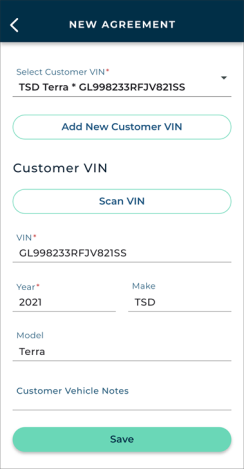
This section consists of information related to the customer's personal vehicle, including VIN, Year, Make, Model, and Customer Vehicle Notes.

  • Select an existing customer VIN. ClosedRead how:
    1. If the customer automobile is already on file, select it from the list.
    2. Tap Save.

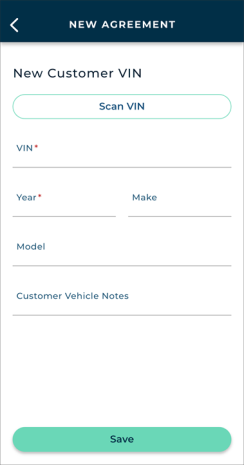
  • Add or scan a new customer VIN. ClosedRead how
    1. Tap Scan VIN and scan the VIN barcode, or tap Add New Customer VIN and enter the required information. (A Scan VIN option is here too.)
    2. Tap Save.

Notes:

  • Customer VIN requirements. Certain fields in addition to VIN may be required based on your Require Customer VIN management setting. Additionally, the Make may need to be approved by your manufacturer or you may need to enter the full, 17-character alphanumeric customer VIN, based on the Require 17-Character for the Customer VIN management setting.
  • VIN validation. Some unit information, such as the Year, Make, and Model, may be filled in based on its VIN by the integrated VIN validation service, ChromeData. In this case, if the VIN is decoded to be invalid, a message is displayed: "Customer VIN is not recognized, please confirm the VIN is accurate."

Delivery and CollectionClosed

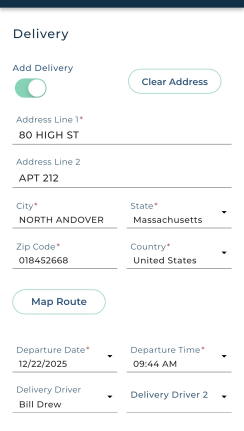
If your location uses Delivery and Collection integration, you can mark an agreement for Delivery (Add Delivery ) and/or Collection (Add Collection ), and, depending on your type of integration, manage addresses and times, map the route, and more. See "Delivery and Collection (Mobile App)".

Additional DriversClosed

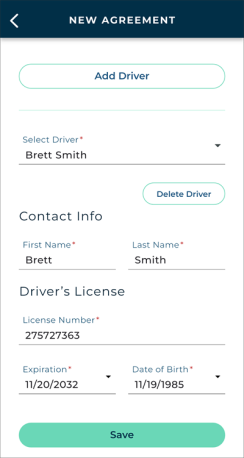
This section is where you can manage additional drivers authorized to drive the unit on the agreement.

  1. Tap the Additional Drivers section. If additional drivers are already present, tap Add Driver.
  2. Scan a driver's license or choose MANUALLY ENTER LICENSE to enter it manually.
  3. Confirm the driver's information, including contact information (name) and driver's license (license number, expiration, date of birth, state, and country), and tap Save.

  • Edit or delete an additional driver. ClosedRead how:
  1. Tap the Additional Drivers section.
  2. If multiple drivers are present, select the Driver you want to edit or remove.
    • To delete the selected driver, tap Delete Driver.
    • To edit the information, make your changes and tap Save.

4. Add a Unit to the Agreement

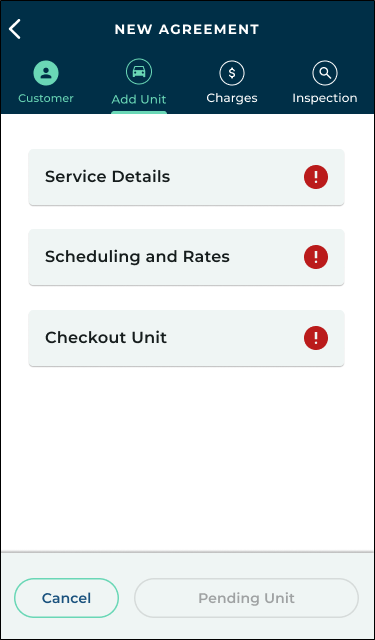
The Add Unit stepper of the agreement consists of several sections.

A section with required information still needing completion is marked (). After you fill in all required fields in a section, it is marked as completed ().


Hover to view the full-sized image.

Service DetailsClosed

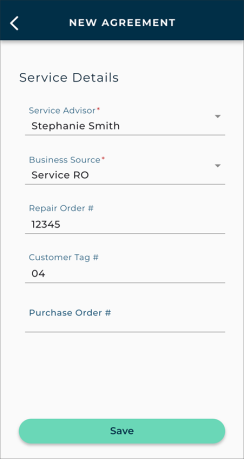
This section consists of Service Details related to service to be performed on the customer's automobile, including Service Advisor, Business Source, Repair Order #, Customer Tag #, and Purchase Order #.

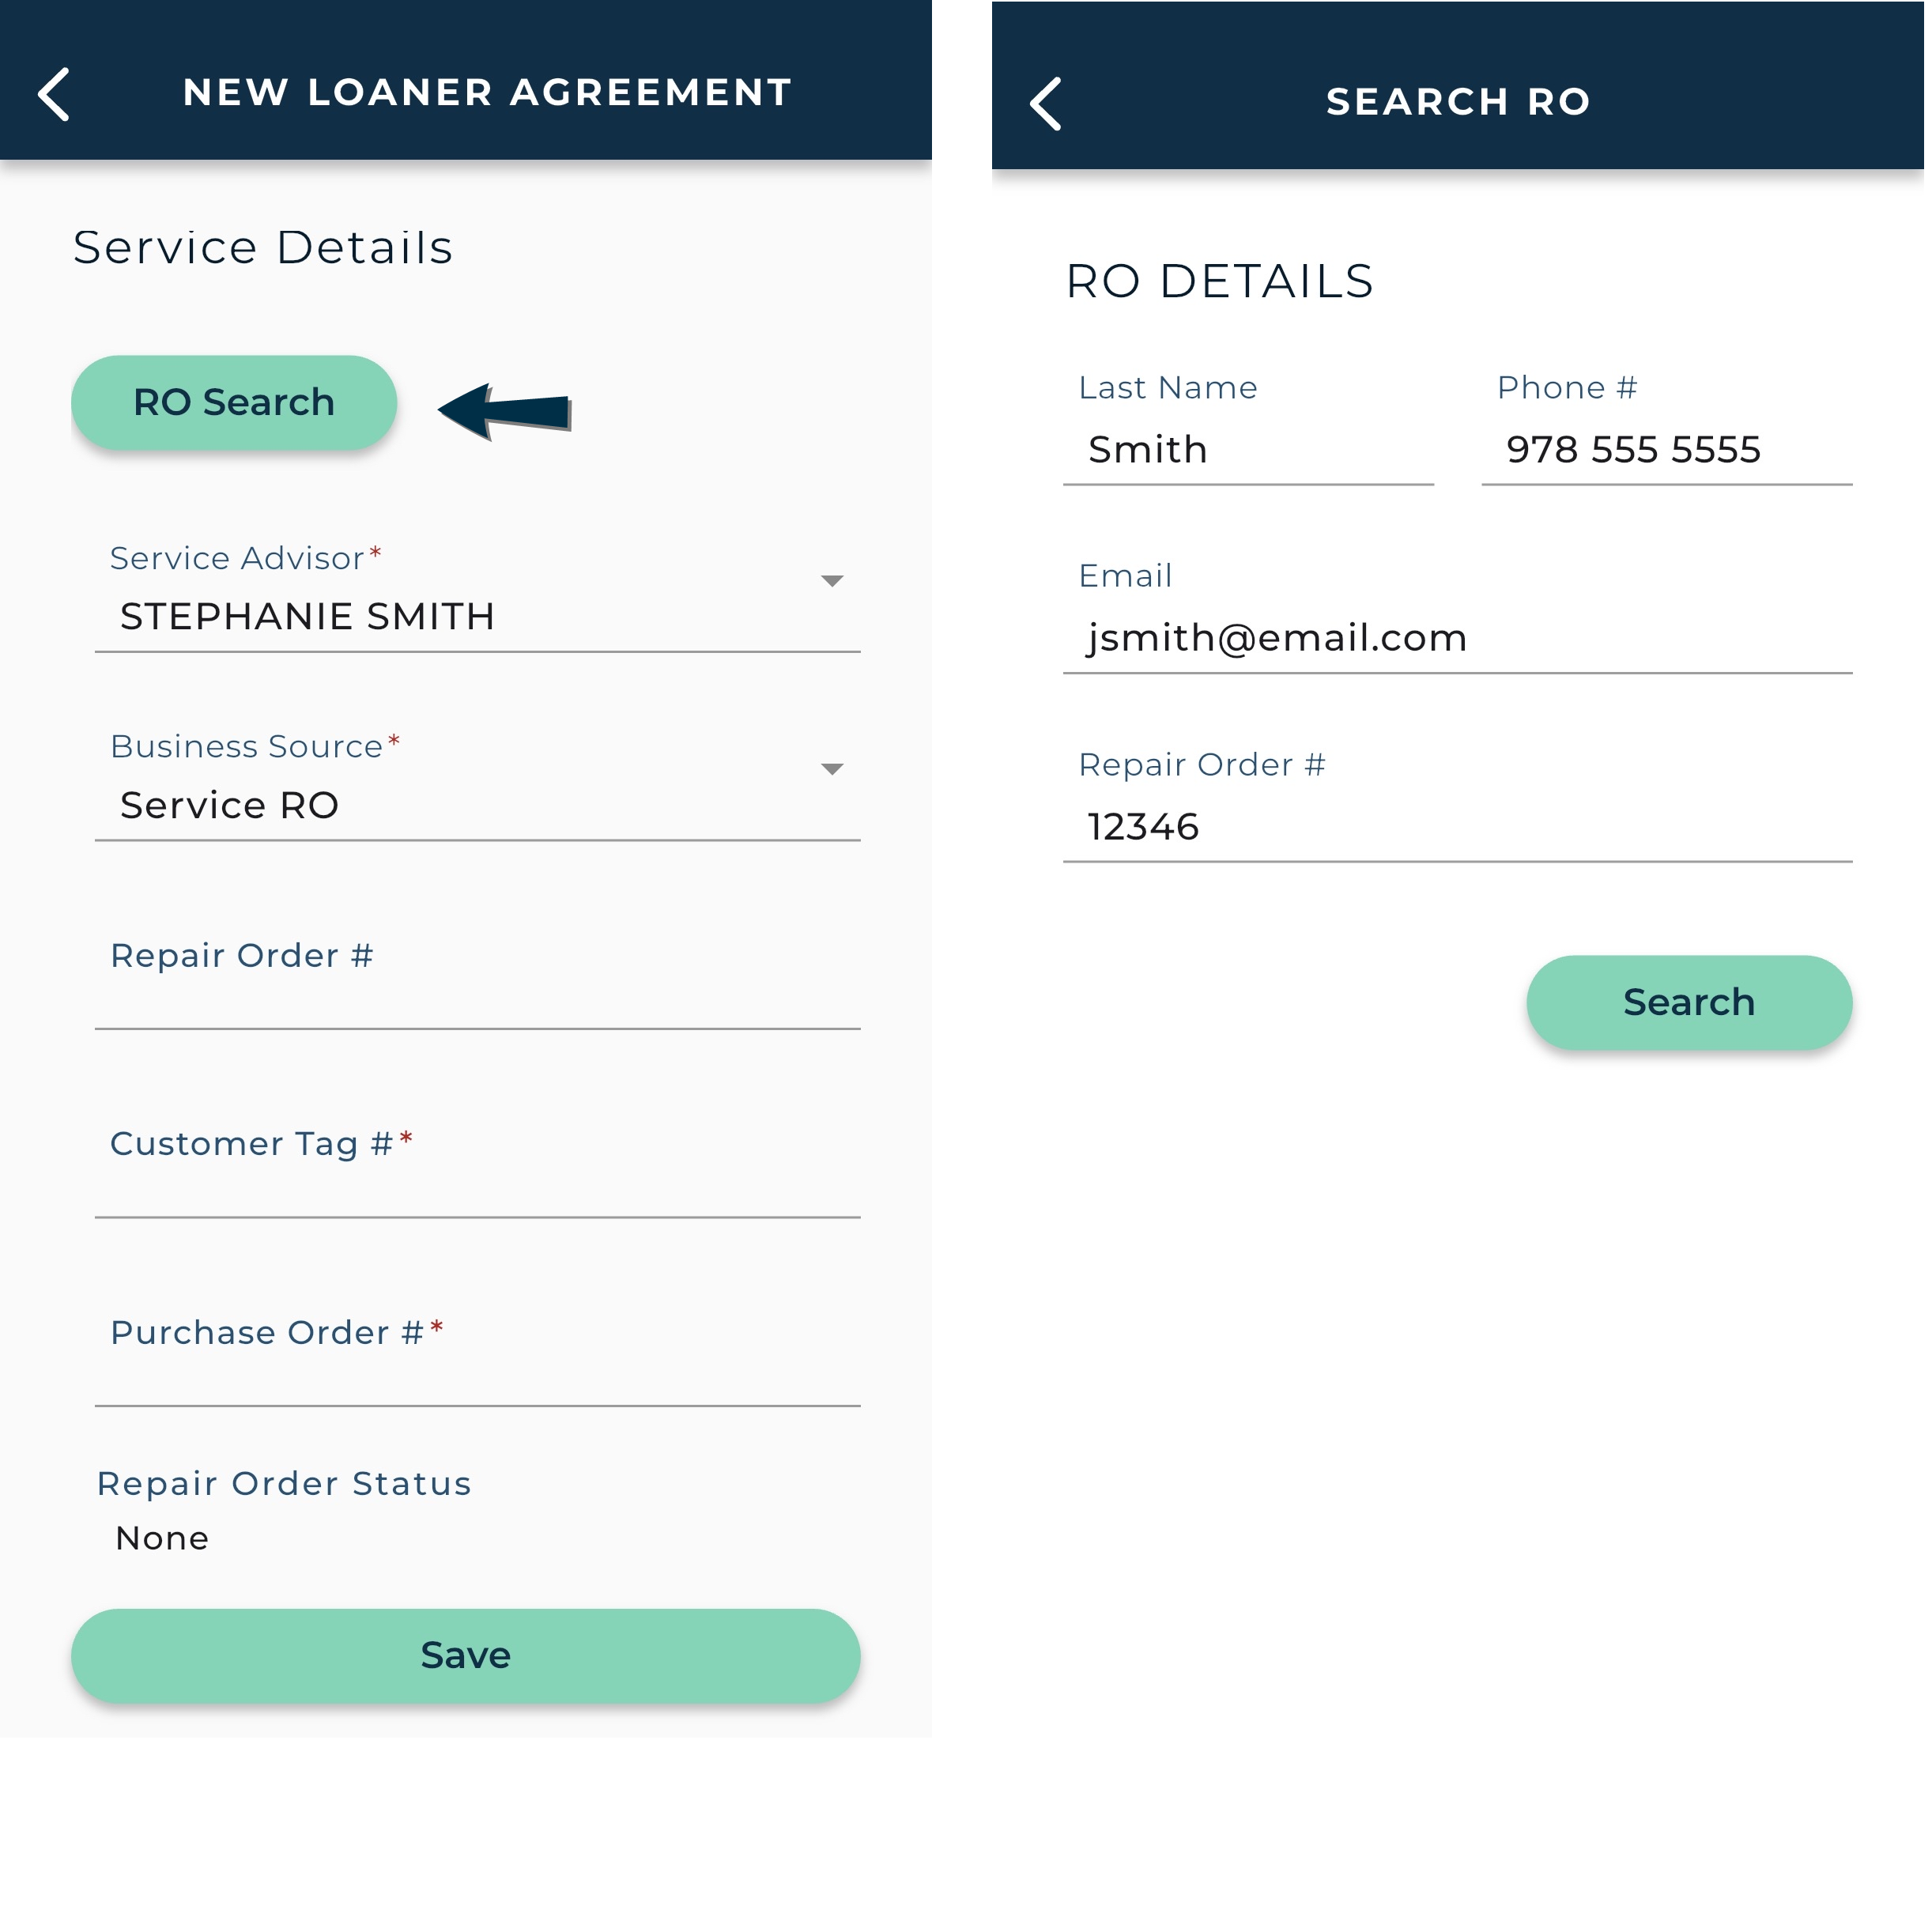
Integration availability: If your location uses Reynolds and Reynolds integration, you do an RO Search add repair orders (ROs) sent from ERA-IGNITE to agreements. Learn more.

When you're finished with this section, tap Save.

Scheduling and RatesClosed

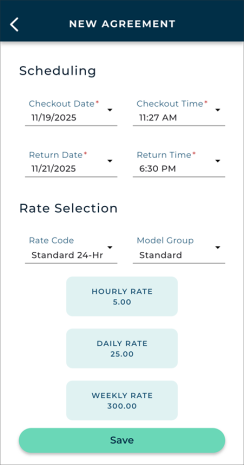
This section consists of Scheduling details, such as Checkout Date / Time and expected Return Date / Time, and Rate Selection for you to choose a Rate Code and Model Group and display the applicable rates.

When you're finished with this section, tap Save.

Checkout UnitClosed

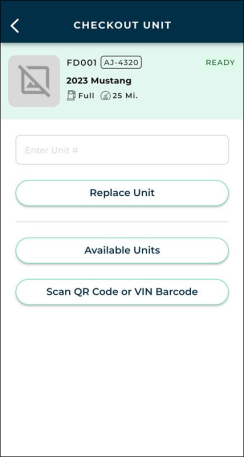
This section is dedicated to the unit assign to the agreement, if one is not already assigned. You can choose how you want to assign a unit:

  • Type the full, exact Unit Number and tap Add Unit. (After a unit is assigned, this button becomes Replace Unit).
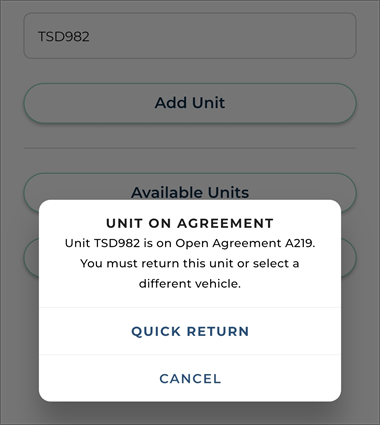
  • Quick Returns: If you enter a unit that is In Use on another agreement, the app displays the option to perform a quick return to free up the unit. After the agreement is closed or close pended, you are returned to the current agreement with the unit now assigned.

    Hover to view the full-sized image.
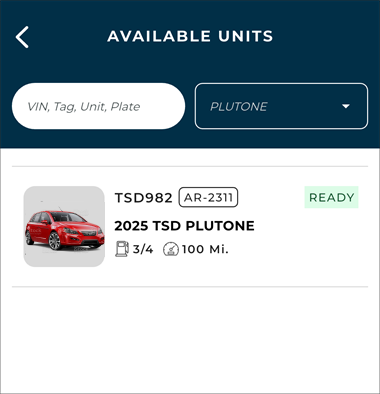
  • Select from a list of Available Units. The list is available for searching by VIN, Unit Tag, Unit Number, or Plate, and filtering by Model.

  • Hover to view the full-sized image.

  • Scan a QR code or VIN barcode by tapping Scan QR Code or VIN Barcode.

After a unit is assigned, you can replace it, if needed, using any of the above methods.

5. Review Charges

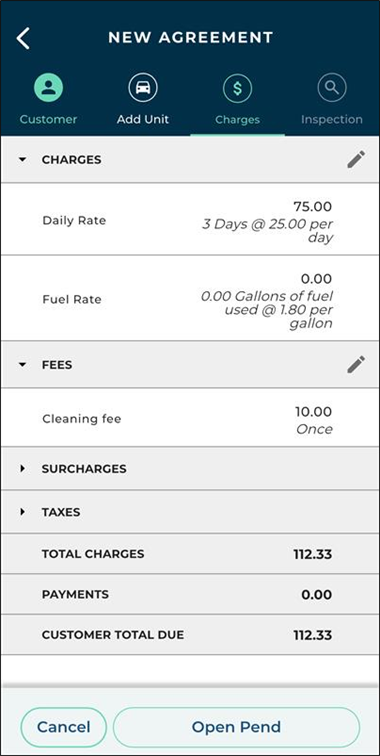
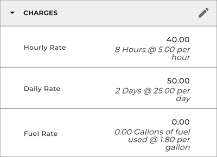
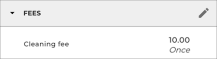
The Charges stepper of the agreement consists a breakdown of charges, fees, surcharges, and taxes, as well as total charges, payments, and the customer total due. Tap to expand any of these line items to view individual charge amounts and make edits, if allowed.


Hover to view the full-sized image.
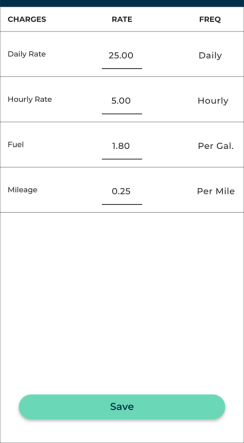
  • Edit individual rate, fuel, and mileage charges. ClosedRead more:
    1. Tap the Edit icon ().
    2. Make changes to amounts, as needed.
    3. Tap Save.

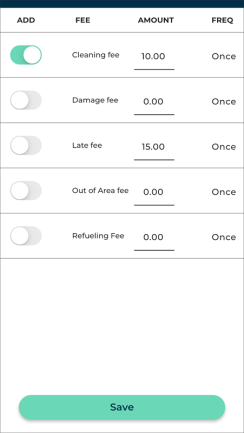
  • Edit, add, or remove fees. ClosedRead how:
    1. Tap the Edit icon ().
    2. Add or remove fees to this agreement using the toggles or edit the amounts of any added fees.
    3. Tap Save.

6. Inspect the Unit

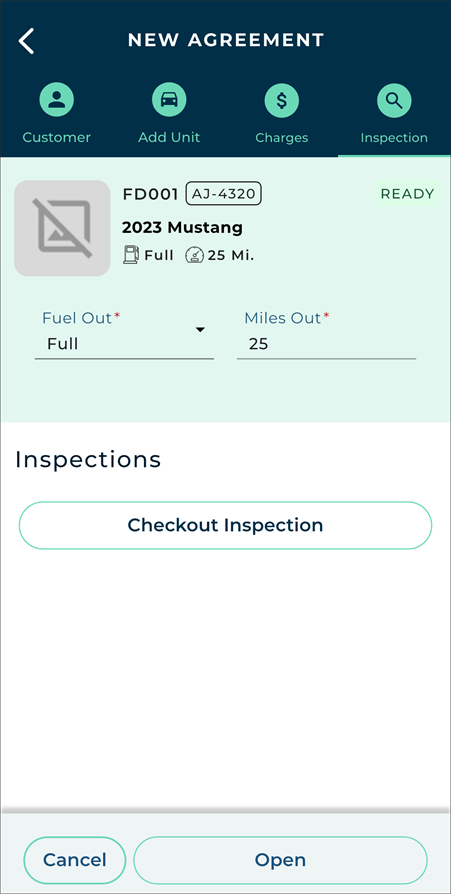
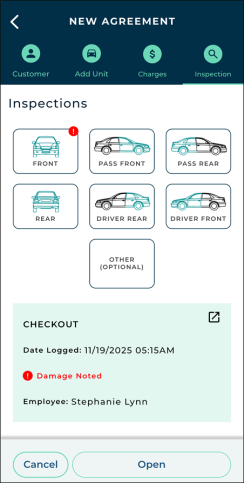
The Inspection stepper of the agreement is where you can record the unit's Fuel Out / Battery Out and Miles Out, and tap Checkout Inspection to take photos and mark damage, as needed.


Hover to view the full-sized image.

ClosedHow to perform an inspection:

The availability of unit inspections on agreements is based on the Enable Agreement Inspection management setting.

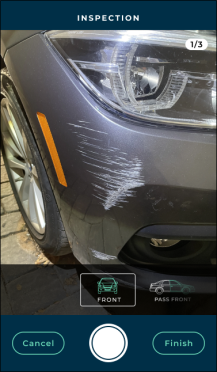
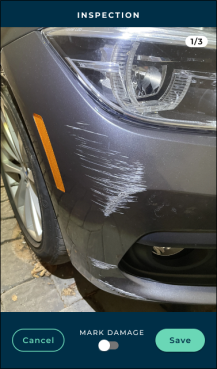
During this inspection, you'll take up to three (3) photos and mark damage, as needed, for all listed zones of the vehicle: Front, Passenger Front, Passenger Rear, Rear, Driver Rear, Driver Front, and Other (i.e., the roof).

  1. Start your walkaround from the front of the vehicle.
  2. Aim your device's camera at the vehicle zone, and tap the Shutter button to take a photo. (If you need to retake the photo, tap Cancel and take it again.)
  3. Tap the Shutter button to take a photo.

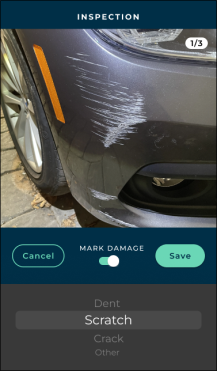
  4. To note damage in the photo, tap MARK DAMAGE , and select the type of damage (e.g., dent, scratch, crack, or other).
  5. Mark damage, if needed.

  6. Tap Save. Both the photo and the damage entry, if noted, are saved.
  7. Repeat as needed, taking up to three (3) photos, total. (The number of photos saved for the zone is displayed in the upper right corner.)
  8. Tap or scroll to the next zone (e.g., Pass Front), and repeat the above for all listed zones, as required. (If inspections are required at your location, you must take at least one photo of each zone.)
  9. When finished inspecting the vehicle, tap Finish.

When you've finished the inspection and returned to the agreement, a summary of the checkout inspection is shown, including Date Logged and Employee who performed the inspection.

Inspection summary on the agreement.

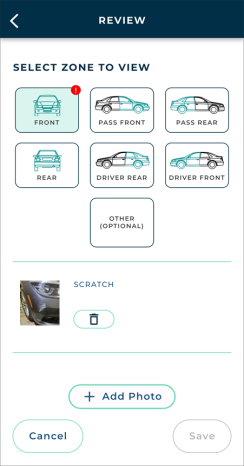
Before you move on with this agreement, you can tap the Details icon () within the summary to review this inspection for each zone. When doing so, you can do the following:

  • Tap a zone to view or delete photos. (Tap a thumbnail to view the full size.)
  • Tap + Add Photo to add a photo (up to three (3), total), and note additional damage, as needed.

If you make any changes when reviewing an inspection, tap Save.

Review inspection.

7. Open and Collect a Signature

Tap Open to complete (save) the open agreement. The app displays a prompt for you to select an agreement form and collect a signature.

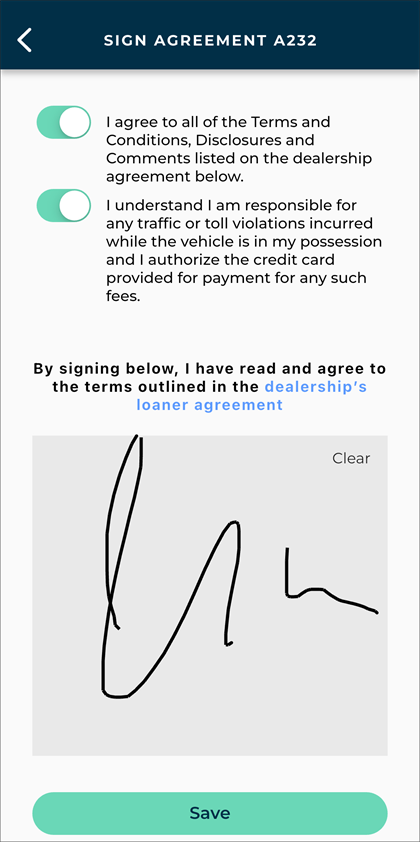
  • Collect an electronic signature. Tap Sign. ClosedRead more:
    • If using Easy Sign:
      1. Have the customer select the toggle(s) to acknowledge all terms and conditions of the agreement, then add a signature. (The text above the signature box contains a link to the agreement form PDF, which you can view and print.)
      2. Tap Save.
      3. Note: Depending on your manufacturer’s settings, an additional optional or required clause toggle may be available (e.g., to have the customer opt in to receive marketing materials).


      Hover to view the full-sized image.
    • If using regular digital signature capture:
      1. Have the customer digitally sign or initial each required signing area of the agreement form.
      2. If your form requires the customer to sign, tapping the signature area displays an enlarged signature box to sign and tap Save.
  • Collect a hard copy signature. Tap Print and Sign.
  • Collect a contactless signature. Tap Email and confirm the email address, or Text and confirm the phone number, then send the agreement form to the customer for a signature.

The agreement is opened! After the signature process is complete, you are returned to the Home screen.

If your location uses automatic texts or emails, a copy of the signed agreement form PDF is texted or emailed to the customer, as long as the customer has opted to receive texts or emails, respectively.

Additional Features & Integrations

Some features may be available on this screen of the mobile app depending on which integrations are connected with your location.

Interested in learning more about any of these integrations? Contact your TSD Sales Representative at sales@tsdweb.com to get started.

Credit Card Processing

Securely collect a customer's credit card and bill for agreement charges (i.e., rates, fuel, mileage, and fees), and/or toll / violation charges, if you have Toll Processing.

Note: If you use Toll Processing integration only (i.e., credit card processing for toll charges only, not for agreement charges), you can only capture a credit card for the purposes of charging for tolls, not agreement charges. See "TSD Toll Connect: Toll Processing" for more information about toll processing.

  • Capture a credit card. Capture a credit card so it is on file for future payment (processed only at close). Depending on your provider, you can do so in several ways.
    • (Stripe) Capture a card with a supported card reader. ClosedRead more:
      1. If needed, tap Pair Reader to pair a Bluetooth card reader with the mobile app. (For full pairing instructions, if needed, see "Pair Reader".)
      2. Tap Capture Card.
      3. Insert or swipe the credit card into the card reader, as indicated.

      4. Hover to view the full-sized image.
      5. (Optional.) Save the captured card for next time. Tap Save Card to Customer Profile to have the card present on the customer record for the next agreement.
      6. (Optional.) Pre-authorize the credit card to hold funds. If pre-authorizations are configured for agreement charges and/or toll / violation charges, tap Pre-Authorize . When opening a new agreement, the pre-authorization occurs at save; otherwise, it is taken at the time the card is captured.
      7. Tap Save. When the credit card is successfully processed, a token is generated for the card and it is added to the appointment / agreement, replacing any previous card. Key card information (card type, last four digits, and expiration date) is displayed (e.g., visa: xxxx-xxxx-xxxx-4747 Exp. 05/28).
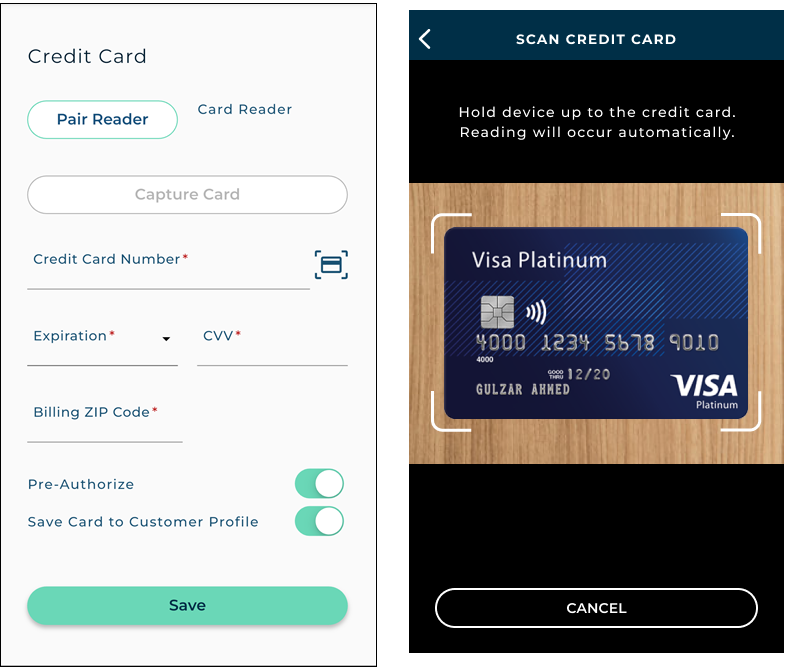
    • Scan a credit card with your mobile device (OCR scanning). ClosedRead more:
      1. Make sure you've given the app camera permission in your settings.
      2. Tap the OCR Scan icon () next to the Credit Card Number.
      3. Hold the front of the card inside the on-screen guide.
      4. When the scanner reads the card, it closes and fills the Credit Card Number and Expiration fields. (You still enter the CVV and Zip Code by hand.)

      5. Hover to view the full-sized image.

        If a card doesn't read, turn on the camera flash, tilt the card slightly, and tap the screen to refocus.

      6. (Optional.) Save the captured card for next time. Tap Save Card to Customer Profile to have the card present on the customer record for the next agreement.
      7. (Optional.) Pre-authorize the credit card to hold funds. If pre-authorizations are configured for agreement charges and/or toll / violation charges, tap Pre-Authorize to have the configured pre-authorization amount taken against the card at save.
      8. Tap Save. When the credit card is successfully processed, a token is generated for the card and it is added to the appointment / agreement, replacing any previous card. Key card information (card type, last four digits, and expiration date) is displayed (e.g., visa: xxxx-xxxx-xxxx-4747 Exp. 05/28).
    • Manually fill in credit card information. ClosedRead more:
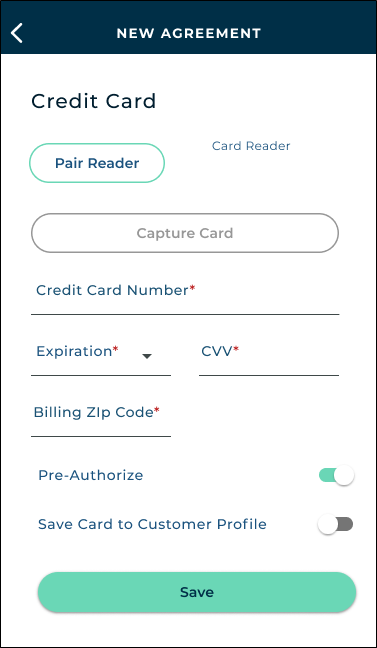
      1. Fill in the billing information. This may look different, depending on your provider.
        • If your provider is Stripe, fill in the Credit Card Number, Expiration, CVV, and Billing Zip Code.

        • Hover to view the full-sized image.

        • If your provider is CenPOS, tap Manually Enter Card and enter the billing information on the CenPOS-hosted Manage Token screen. Click Submit to return to the agreement.

        • Hover to view the full-sized image.

      2. (Optional.) Save the captured card for next time. Tap Save Card to Customer Profile to have the card present on the customer record for the next agreement.
      3. (Optional.) Pre-authorize the credit card to hold funds. If pre-authorizations are configured for agreement charges and/or toll / violation charges, tap Pre-Authorize . When opening a new agreement, the pre-authorization occurs at save; otherwise, it is taken at the time the card is captured.
      4. Tap Save. When the credit card is successfully processed, a token is generated for the card and it is added to the appointment / agreement, replacing any previous card. Key card information (card type, last four digits, and expiration date) is displayed (e.g., visa: xxxx-xxxx-xxxx-4747 Exp. 05/28).
  • Bill potential tolls / violations to the captured card. Make sure you've captured a credit card to charge for tolls / violations, and tap Charge Violations to Customer . If toggled off, these will be billed to your location. Payments are automatically processed when tolls / violations are incurred.
  • Pre-authorize a captured credit card to hold funds.
    1. Important Note: When opening a new agreement, the pre-authorization is processed at save. However, if viewing / editing an agreement after open, the pre-authorization will be processed when a new credit card is captured. This means that, for Rentals, if you have a Rental pre-authorization set up, after you capture a card, the pre-authorization is already processed and you cannot edit the amount; the Edit Pre-Auth button is not displayed.

    2. Tap Pre-Authorize .
    3. (Rentals only, if applicable) Edit the pre-auth amount. If you have a Rental pre-authorization set up for Rental agreements and this is at open or editing an open agreement, you can tap Edit Pre-Auth to customize the amount of the pre-authorization (anything over $1.00). You'll also find your configured Rental pre-authorization amount defaults displayed for easy reference. If you edit the amount, it will be updated.
Delivery and Collection

Delivery and Collection brings your location to your customers' driveways. See "Delivery and Collection: an Overview" for setup requirements and more information about how it works on the web.

  • Mark an agreement for Delivery and/or Collection. Toggle Add Delivery and/or Add Collection .
  • Manage addresses and times, map the route, and more, depending on your integration. See "Delivery and Collection (Mobile App)".
Insurance Verification Integration

Insurance verification integration is sold separately. Contact your TSD Sales Representative at sales@tsdweb.com for more information.

Insurance Verification automates your process of capturing and/or verifying a customer's automobile insurance policy.

Note: For setup requirements and complete details on this integration, see "Insurance Verification Integration". This section covers only the mobile-specific actions:

  • Request insurance verification from the customer. This may be required on new agreements, based on your settings. In the Insurance section of the agreement, tap Request Insurance Verification, then choose to have the customer scan a QR Code on your screen to access the Insurance dialog, or text the QR code to the customer.

  • Hover to view the full-sized image.

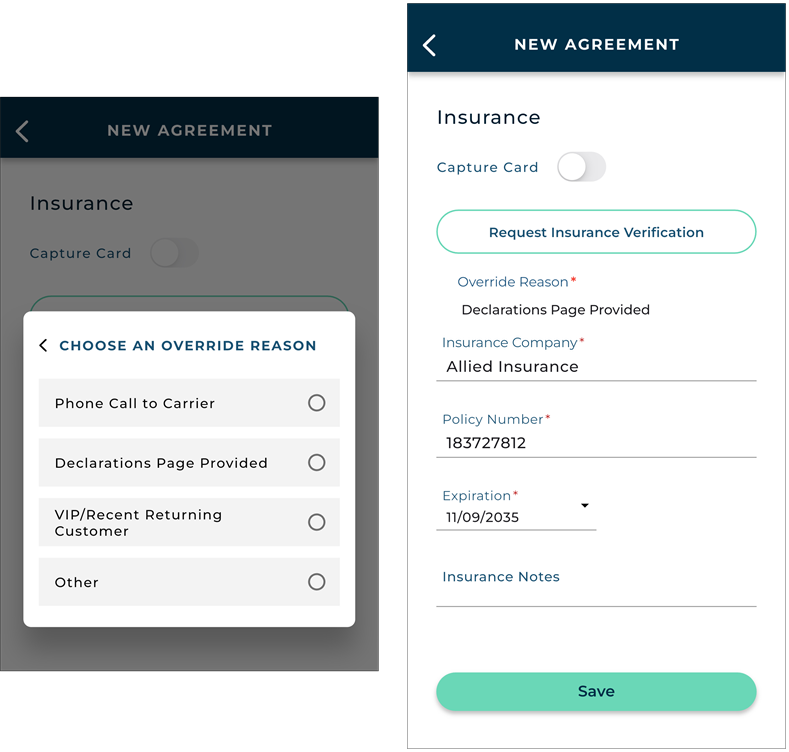
  • Override the insurance verification requirement, if applicable. If insurance verification is required on your agreements, employees with the Allow Override Insurance Verification permission have an Override Verification button to bypass this requirement. This makes the insurance fields available to fill in, and displays your Override Reason.

  • Hover to view the full-sized image.

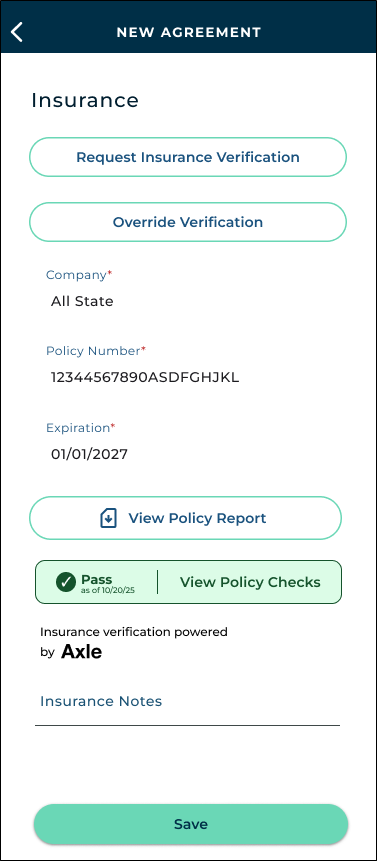
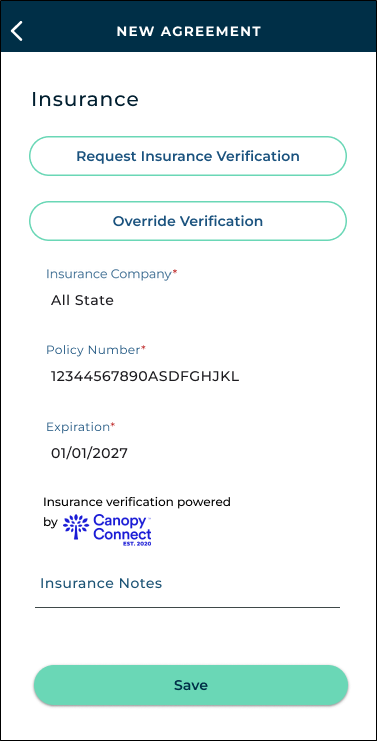
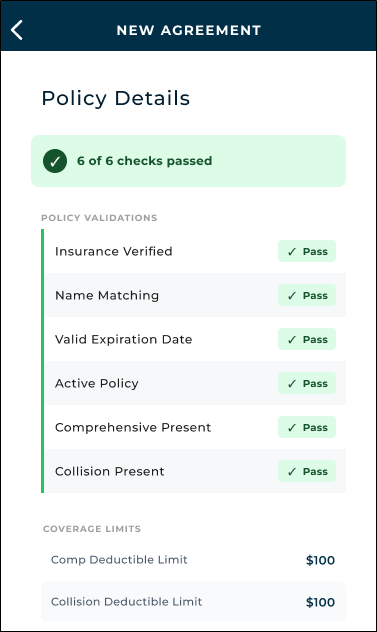
  • View insurance policy details. After a policy is connected, the agreement displays the following:
    • Insurance fields filled in
    • The provider's verification badge
    • Pass / fail status & policy details Axle - tap VIEW POLICY CHECKS
    • Policy report Axle - tap View Policy Report
    • Insurance declaration page Canopy.
    • Insurance card or document photo (if uploaded) - tap to zoom

    Verified insurance, with Axle, and policy details
    Hover to view the full-sized image.


    Verified insurance, with Canopy Connect
    Hover to view the full-sized image.

Reynolds and Reynolds Integration

HMA SRC's integration with Reynolds and Reynolds facilitates real-time communication between your Reynolds Dealer Management System (DMS) and HMA SRC. See "Reynolds and Reynolds Integration" for setup requirements and more information about how it works on the web.

  • Open agreements from appointments sent from ERA-IGNITE. Appointments contain the RCI Appointment Number, Repair Order Status / RO Status, and the Source of Origin is set to 'Reynolds'.
  • Add ROs to agreements. Add repair orders (ROs) sent from ERA-IGNITE to agreements, as long as they are not already associated with an appointment or agreement. ClosedRead more:
    1. On the Service Details section of the Add Unit stepper, tap RO Search.
    2. On the Search RO screen, enter the Last Name, Phone, Email, and/or Repair Order Number; these are filled in, by default, from the record.
    3. Tap Search. Based on any of your criteria, the system searches for an RO not already associated with an appointment or agreement.
      • If only one RO is found, it is automatically added to the record. A brief confirmation message is displayed: "Repair Order Appended".
      • If more than one is found, you can select the one you want to add.
      • If no RO is found, try repeating your search with other criteria.
    4. When an RO is added to an agreement, the Repair Order Status / RO Status field is set accordingly, and the following information is updated with information from the RO: Repair Order Number, Expected Return Date / Time, Customer Automobile (VIN, Year, Make, Model), and Agreement Notes.


    Hover to view the full-sized image.
Appointments From Web Schedulers

If your location is integrated with a web scheduler or third party that sends appointments to HMA SRC, those appointments are available in the mobile app.

  • Identify appointment sources. Appointments show the Origin for the booking, if different than an appointment directly created in HMA SRC.
  • Open agreements from appointments. Access appointments using the Today's Appointments card on the Home screen.
Open Pend an Agreement

The Pend Agreement function is only available based on the Enable Open Pending Agreements management setting.

"Open Pend" an agreement to save it with a Unit Pending status if you want to complete most of the agreement and assign a unit later (e.g., if it is unavailable now).

  1. Fill in all required information on the agreement, except for assigning a unit (the Checkout Unit section of the Add Unit stepper).
  2. Tap Open Pend at the bottom of the screen, available when all required information is completed (except for unit assignment).
  3. The agreement is saved with a status of Unit Pending. You are returned to the Home screen.
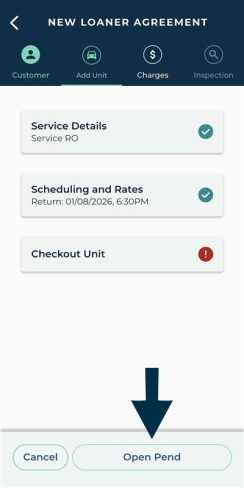
When it's time to assign the unit, you can search for this agreement using the Open Pending card on the Dashboard, assign the unit, and complete the open process.