
|
TSD DEALER Counter Guide
The TSD DEALER Counter Guide is a reference intended to help new users with common software functions including opening and closing agreements, booking appointments, managing fleet, and more.
Logging In
https://cirro.tsdweb.com
Save the link as a favorite to easily access TSD’s web-based software. You will need to enter your TSD Number, User Name, and Password.
Online Training Tools
Interactive Online Tutorials
Navigation from your Home screen:
 OR
OR 
TSD offers a suite of training resources to help you become an expert at setting up and using TSD DEALER, and how to take advantage of the application's key features to streamline and improve your business.
Click  to open a list of applicable tutorials pertaining to your current screen, or click from the top menu to view all available training resources, including:
- Tutorials: Learn the How's. These are self-guided training courses contains multiple topics with how-to videos, written walkthroughs, and practice software simulations that cover key setups and usage of the application.
- TSD University: Learn the 'Why's. TSD University consists of short videos led by TSD experts to help you learn why key features benefit your business. These are broken down by level of difficulty (Bachelor's, Master's, and Doctorate), with filters on the left panel, so you can choose what works for you.
Online Help
Navigation from your Home screen:
 OR
OR 
The TSD DEALER Online Help offers walkthroughs, FAQs, Release Notes, and best practices to help you make the most of the application. On each page of the application, you'll find a Help icon () to pull up the Help topic relating to that page.
Important information is found in the Frequently Asked Questions (FAQs) topic, accessible from anywhere using the  icon. You may also click any of the books on the top to drill-down for more information; each book serves like a chapter in a user manual.
Creating Appointments
Navigation from your Home screen:
 > New Appointment OR from customer search results.
Create appointments to have a clear picture of expected fleet demand and to expedite your customers through the agreement process when they arrive for their vehicle.
Note: The total number of appointments that can be booked on a single Checkout Date is subject to your location's Daily Appointment Cap.
- For new customers, click the plus icon (
 ) and select New Appointment. Or, pull up an existing customer record on the Customers tab and click
 - Select the type of appointment (e.g., Loaner, Rental, etc.), if applicable. This will determine the type of agreement opened from the appointment and the rates available on the appointment, if applicable.
- Enter or verify the required customer information, marked by red asterisks (*). Click .
- Enter or verify any required repair order information, marked by red asterisks (*).
- (Optional.) Add Delivery and Collection.

- Verify the Checkout Date and select a Return Date of no more than 29 days into the future.
- (Optional.) (Required for Rental appointments) Select a rate, if necessary.
- (Optional.) Review charges and fees, if applicable.
- (Optional.) Add or change a credit card, if applicable.
- (Optional.) Assign a unit or model from your fleet.
- Click .
Turn on an Appointment Booked alert, so you can be notified when an appointment is created. See "Alerts" for more information.
Expedited Appointments
TSD DEALER offers a way for your customers to speed up their experience by remotely accessing their appointments and updating information in advance.
When your location is configured to use automatic texting or emailing and the Expedited Appointments feature, an automatic text or email is sent to the customer when the appointment is created. The text or email contains a link to an online version of the appointment that customer can access to update his or her information. See "Expedited Appointments" for more information.
Opening Agreements
Navigation from your Home screen:
> New Agreement OR from appointment or customer search results.
- Begin the open agreement process.
- Open from an existing customer record or appointment. Read more:
- Open a walkup agreement from scratch. Read more: Click the New icon () in the bottom-right corner of your screen and select New Agreement. Choose the type of agreement (e.g., Loaner), if applicable.
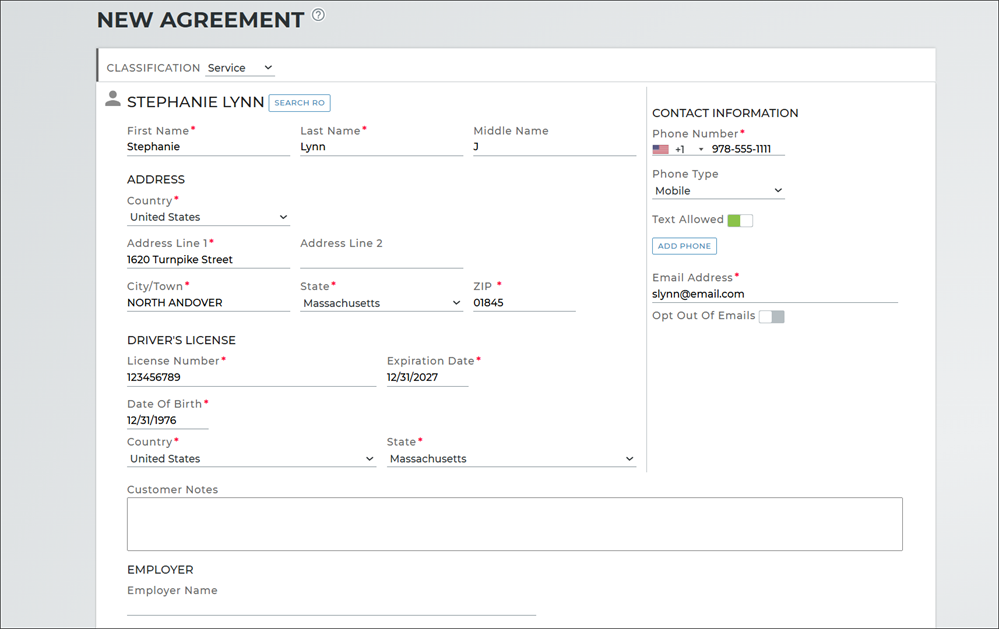
- (Optional.) Search for a customer. Click at the top of the customer section to search by any combination of full First Name, Last Name, Phone, Email, and/or License Number, based on exact field matches. You can then select the customer record you want to use on the agreement. See "Customer Searches" for more information.
- Enter or verify the required customer information. This includes contact information, driver's license, and additional drivers, if applicable. See "Customer Criteria and Alerts" for information on customer eligibility requirements.
- (If applicable) Add delivery and collection information. See "Delivery and Collection".
- Add insurance information. See "Add Customer Insurance Information or Upload an Insurance Card Photo".
- Select or add a customer automobile for service. See "Customer Automobiles / Customer VIN".
- Enter repair details. See "Add Repair Order".
- Select dates. The Checkout Date / Time is set to now, by default. Select a Return Date (the Time defaults to the current time). The Total Days is displayed.
- Select a rate, if applicable. If applicable for this type of agreement and your rates setup, select a Rate Code and Model Group to apply the applicable rate. Read more.
- Review charges. A Charges grid is displayed with applicable charges (rates, fuel charges, mileage charges), fees (auto-applied), surcharges, taxes, and the total. You have the following options, with respect to managing agreement charges:
- Split invoice. Add a company (e.g., an insurance company) to the bill via the button to split rate charges and taxes on those rate charges. This produces two invoices. See "Create a split invoice (add a billing company to cover charges)" for more information.
- Edit charge amounts. Click the Edit icon (
 ) to edit individual rate or fuel charge amounts. Subject to the Allow Modify Agreement Rate permission.
 - Add or remove fees. Click the Add icon (
 ) to add an additional fee, or edit () to edit the amount of an applied fee. Subject to the Allow Modify Agreement Rate permission.
 - Capture a credit card (and other credit card processing options). If you use Credit Card Processing, depending on your specific setup and requirement settings, you can capture a credit card (), have a pre-authorization taken at agreement open (Pre-Authorize), and save the credit card to the customer profile. See "Credit Card Processing" for more information.
- Bill for toll violations. See "TSD Toll Connect: Toll Processing" for more information.
- (Optional.) Add any agreement notes and upload any relevant agreement attachments.
- Assign a unit, or choose to pend the agreement and assign one later. Click to assign a unit now, or click if you plan to assign one later (e.g., if it is being cleaned now).
- Verify unit information and perform a unit inspection. Make sure the Miles Out and Fuel Level Out / Battery Out is accurate. Perform an inspection of the assigned unit and add any damage or log its current condition. See "Unit Inspections".
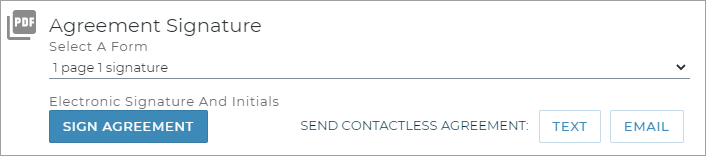
- Collect an agreement signature. Select an agreement form from the list, then collect a signature to complete the open agreement process:
- Collect a contactless signature through email or text. Make sure the customer's phone is filled in and Text Allowed is enabled (for texting), or that the customer's email address is filled in (for emailing). Click or . See "Contactless Agreements: Remote Signatures" for more information.
- Capture an electronic signature. Click .
- If using the Easy Sign feature (Easy Customer Signature), a Sign Contract dialog is displayed, where the customer only needs to tap a single toggle and sign once to acknowledge all terms and conditions of the agreement.
- If using the full electronic signature capture method, you can request a digital signature or acknowledgment (if applicable) in each required signing area on the form.
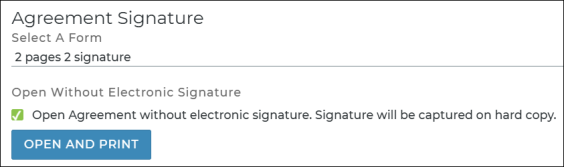
- Print a hard copy and collect a signature. Select the "Open Agreement without electronic signature" check box, then click . Print the agreement form and capture the signature on the hard copy. If your location uses automatic texts or emails, a copy of the unsigned agreement form PDF is texted or emailed to the customer, as long as the customer has opted to receive texts or emails, respectively.
- Send the agreement to your Delivery and Collection provider's app for signature. If using Delivery and Collection integration with a third party partner, you can click to send the agreement form to your provider's driver app to update the fuel and mileage, as applicable, and obtain a customer signature. The agreement will have a status of Incomplete until the provider returns the signed agreement form. See "Delivery and Collection With a Partner" for more information.
- After the agreement is opened, you are returned to the View Agreement screen. See "View and edit an agreement" for options on what actions you can take when viewing an open agreement.
Hover to view the full-sized image.
Note: For locations with the Credit Card Capture Required at Open Agreement management setting turned on, capturing a credit card is required to complete the open agreement process. For employee roles with the Allow Override Credit Card Capture permission, capturing a card is optional.
For locations with automated Toll Processing, you can have your customer's credit card automatically billed for any toll charges incurred on the agreement (Bill Violation Charges or Charge Violations to Customer on mobile), or leave this option cleared to have them billed to your location.
If your location has pre-authorizations enabled via the Credit Card Required at Open Agreement setting, and the Pre-Authorize option is also selected, then the card will be pre-authorized an additional amount for possible future toll charges. See "Pre-Authorizations" for more information.
Note: After you assign a unit, your Rate Code and Model Group selections are unchanged, even if the unit is not within the selected Model Group.
When signed, save the signed form to the agreement by clicking (to save without printing) or (to save and open a PDF of the form to print). The signed agreement is available in the Agreement Files section of the agreement for emailing, printing, and downloading.
If your location uses automatic texts or emails, a copy of the signed agreement form PDF is texted or emailed to the customer, as long as the customer has opted to receive texts or emails, respectively.
Contactless Agreements
Implement a completely contactless open agreement process on the web or iOS mobile app by obtaining a signature from the customer remotely, through a text message or email that contains a link to a signable PDF.
Note: You cannot collect a signature through text or email if the agreement is marked for Delivery and Collection with a partner. In this case, you will send the agreement to your provider's driver app to obtain a signature and complete the agreement process. See "Delivery and Collection With a Partner" for more information.
- When opening an agreement or viewing an opened agreement, make sure the customer's phone is filled in and Text Allowed is enabled (for texting), or that the customer's email address is filled in (for emailing).
- Select an agreement form PDF and click or .
- On the Send Contactless Agreement dialog, confirm the agreement form and email address or phone number, then click (or , on the mobile app) to complete the agreement process and send the customer a link to the signable agreement form PDF.
- After the text or email is sent, the customer will have 24 hours in which to access and sign the document in a web browser or Safari on a mobile device. (The contract can only be signed once using this link, but if it expires or you make any changes to the agreement, you can send another link from the View Agreement screen.)
- After the customer signs and submits the form by clicking , a copy of the signed agreement PDF is displayed in the customer's browser and the signed agreement PDF is saved to the agreement. If a text was originally sent, then a follow-up text is sent to the customer, containing a URL to the signed agreement form PDF. (This URL expires after the agreement is closed, so customers can access the signed agreement through the duration of the rental.) Similarly, if an email was originally sent, then a follow-up email is sent, containing the signed agreement form PDF as an attachment.
- (Optional.) You can view the signed agreement, or send another link to signable PDF form, from the View Agreement screen. See "TSD DEALER Counter Guide".
![]()

Turn on a Contactless Signature Captured alert, so you can be notified when a customer signs a contactless agreement. See "Alerts" for more information.
When a customer submits a signed loaner agreement form, a "Form Signed" event is logged in the agreement's History.
Closing Agreements
It is important to close out your agreements with an accurate date, time, mileage, and fuel level.
- Find the agreement, and click . If already viewing the agreement, click Close Agreement.
- Update the Miles In and Fuel Level In / Battery Level In, if necessary, and any other required information, marked by red asterisks (*).
- Perform a unit inspection.
- Edit charges and fees.
- Add or change a credit card, bill for tolls / violations, and process a payment.
- Click . The following occurs:
- If your location uses automatic texts or emails, a copy of the most recent signed or unsigned agreement form PDF is texted or emailed to the customer, as long as the customer has opted to receive texts or emails, respectively. See "Automatic Texting and Emailing" for more information.
- If your location is set up with the Signed Return Agreement feature, a final, signed version of the closed agreement is automatically generated after close or quick return, with the final return information filled in. Both this final version, along with the previously existing signed form are available under the Agreement Files section when viewing a closed agreement. See "Signed Return Agreement Files at Close" for more information.
- If maintenance is scheduled for the unit, an alert is displayed. See "Unit Maintenance" for more information.
- The signed agreement form PDF is available for printing. On the Agreement Hub, search for the closed agreement and click to open the signed agreement form PDF in a separate browser tab for you to print.
Note: If your location also uses TSD Telematics, data from the KAI Key Reader is used on the agreement instead of the Connected Car telematics device, as long as the Prioritize Key Reader Data option is selected in your BMW Key Reader Management setting in Admin Setup.
Additional options:
Note: If TSD Toll Connect (toll processing) is enabled for the location, an email address is also required to close the agreement.
If your location is set up for automatic emails, an email is automatically sent to the customer when an appointment is created or when an agreement is opened or closed. You can also manually send an email to the customer by clicking the Email Agreement button on the side panel of an opened or closed agreement. By default, the email address is the one on the customer's record; you can choose to enter a different email address without changing the customer's record. Click .
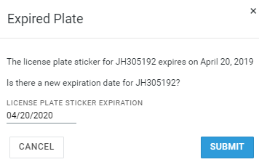
- Plate and sticker expiration checks: TSD DEALER checks the license plate and inspection sticker expiration dates on returning vehicles. If the date has passed, or if it falls before the agreement's Return Date, a message is displayed, including the number of days remaining, if applicable.
- Daily Odometer Limit: If you have set up the Daily Odometer Limit management setting in Admin Setup and the customer's agreement has exceeded that number of miles per day, a notification will be displayed.
A section may be displayed at the top of a customer record, unit record, appointment, or agreement, if any warning messages have been attached to a customer, or if any unit alerts are present. See "Unit Availability & Alerts" for more information.
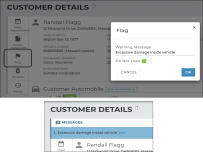
 Messages
You can attach a warning message to a customer record via the Flag button on the side panel of a customer record. When flagging a customer, you can prevent agreements from being opened for this customer using the Do Not Loan option.
Customer-related messages can only be edited or deleted from the customer record (an button is available next to the message.)
Searching for Agreements
Navigation from your Home screen:  Agreement
Find agreement records easily using the application's search function; use the search filters to find any agreement status.
When searching for records that include a special character (such as a colon or hyphen), use quotation marks for an exact search or do a partial search. For example, to find a record with an associated Unit Number of TSD1-4, try searching TSD1 for a partial search, or entering "TSD1-4" for an exact search.
Note: Your search results contain records from all locations to which you have viewership. If you select a record from another location, a message is displayed letting you know that the record exists at another location and you're provided the option to automatically switch to that location to view the record.
Use the Search Open tab for the quickest way to view a list of open agreements, or click a status tile on the Agreement Operations dashboard.
- Enter search criteria on the Agreement Hub. For example, you can search by any of the following: Agreement Number, assigned unit, RO Number, or a customer's name, driver's license number, or Customer VIN (partial or full) of a customer automobile on file.
- (Optional.) Select from the Filters list to narrow your search by category: Agreement Number, Repair Order, Unit Number, License Plate, VIN, or Customer Phone Number. By default, all categories are included. So, if you want to search for an agreement associated with Unit 'U007', enter U007 in the search bar, then select Unit Number from the list.
- Click . Up to 100 results are shown, by default, but you can choose to display 10, 25, or 50 entries, as well as navigate to the next page of results. Results are sorted by the most recent open agreements, followed by other groups of agreement statuses, sorted in descending order by Checkout Date.
- (Optional.) Use search filters to narrow results. Click the check boxes in the following search filters to narrow results:
 ) or List (
 ), and set as your default view.
  ) to export the list to a CSV spreadsheet, and the PDF button (
 ) to export your results to a PDF.
 Managing Fleet
Navigation from your Home screen:  Fleet
Fleet
You can use the Fleet Hub to add or remove units, view and edit unit information (including changing a unit's location or status), view a unit's history.
If your location uses automated Fleet Import, there is no need to manually add units to TSD DEALER. The Fleet Import process automates your in-fleeting process, leveraging unit information provided by your OEM to create new unit records during the Retail Delivery Report (RDR) process. You can:

- View a list of Pending Import Details units; a prompt is displayed at log-in if there is at least one unit awaiting import. You can also view these units in your Fleet Operations dashboard.
- Click , then enter as much information as possible, based on the VIN, on the Import From Feed dialog.
- Click .
Your employee role must have the Edit Fleet permission to edit unit records, the Fleet Status permission to change a unit's status, and the Remove From Fleet permission to remove a unit from the fleet. See "Roles & Permissions" for more information.
- Search for the unit record, if necessary. Click the record from your search results to view it.
- Edit a unit record. Click from your search results, or view the record and click Edit Unit from the side panel. Make your changes, and click . Some fields may be unavailable for editing. See "TSD DEALER Counter Guide" for information on fields and options on this page.
- Options while viewing a unit record. Depending on the unit's status, you can do the following when viewing the unit record:
- Edit a unit record. Click Edit Unit from the side panel. To edit maintenance information, click the edit button (
 ) on the section you want to edit.
- Inspect a unit.
- View inspection history.
- View unit record history (events).
- View an associated agreement.
- Print a unit QR code.
- View or edit messages, if applicable.
- View a map of the unit's location with Connected Car Integration (with GPS).
- View recall information.
Note: Updating a unit record does not update the information on any associated agreements.
An Inspect button is available on the side panel of a unit record for you to note vehicle inspection results. See "Unit Inspections" for more information.
When adding a new unit to the fleet, type a VIN and press Tab for the unit to be matched with a model in your system; TSD DEALER fills in certain fields, which you can edit, if necessary.
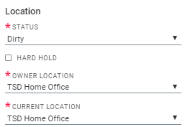
Use the Status field in the unit record to change a unit's status, and the Owner Location and Current Location fields to change a unit's location.
Perform a walkaround inspection and mark any areas of unit damage while viewing a unit record, exchanging a unit on an agreement, and, depending on your management settings in Admin Setup, during the open or close agreement process. For transparency’s sake, the filled-in damage diagram is included on the customer’s printed or emailed form. Contact the TSD Forms Department at support@tsdweb.com for information on how to customize your form.
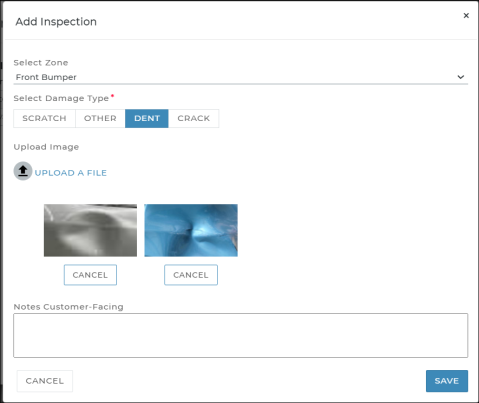
- If inspecting a unit outside of an agreement or exchange, search for the unit record in the Fleet Hub and click . If already viewing the unit record, click Inspect from the side panel.
- Select a location of damage on the diagram, or click . Existing damage records, if present, are indicated on the diagram by an orange icon (
 ).
). - Select or confirm the area of damage (Zone) and select a Damage Type.
- Indicate the severity of the damage (general or chargeable).
- (Optional.) Upload photos of the damage. Drag and drop an image or click
 to select one. You can upload up to 12 photos. If you want to re-upload an image, just click and upload it again.
- (Optional.) Add notes.
- Click . Verify the information and click to return the unit record, unit search results, or to the agreement or exchange, as applicable. A damage diagram is included on the customer’s printed or emailed form, with areas of damage marked with an 'X', if applicable.
Note: You cannot update miles or fuel level when performing an inspection outside of an agreement.
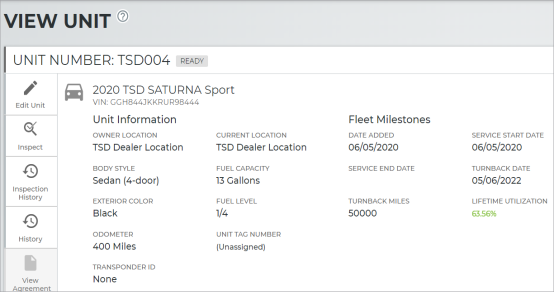
Key Fields and Sections of a Unit Record
| Field | Description |
|---|---|
| Hard Hold | This check box prevents a unit of any status from being assigned to a customer. When putting a unit on hard hold, a Hard Hold Reason is also required. Browse the Fleet Hub glossary for more information on these fields. |
| Messages |
If any unit alerts apply to a unit, such as an expired license plate, an expandable section is available at the top of a unit record, appointment, or agreement. See "Unit Availability & Alerts" for more information. |
| Unit Inspection | This section on a unit record displays any the number of areas of damage marked during an inspection. Click the edit button () to add or manage inspection information. |
| Enable Connected Car | For locations with TSD Telematics, if a unit's Owner Location has Connected Car integration this field available while editing the unit record to turn on Connected Car for the unit. See "TSD Telematics" for more information. |
Live Operational & Performance Data
Daily Activity
Navigation from your Home screen:
 >
>  or
or 
Your Operations and Performance dashboards offers status breakdowns for appointments, agreements, and fleet, as well as important metrics, such as Utilization, Length of Use (LOU), Turn Rate, and more. See "Operations & Performance Dashboards Overview" for more information.
Length of Use (LOU)

Your Performance dashboard ( ) includes your Length of Use (LOU), in days, or the average length of agreements opened at the location that were closed in the last 30 days. In other words, this is the total number of days on closed agreements divided by the total number of closed agreements. (Days from Third Party Agreements are excluded.)
Fleet Utilization
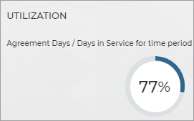
Your Fleet Performance dashboard () includes your utilization percentage. Fleet utilization is an important metric for you to monitor weekly and monthly in order to help determine your business's efficiency, the need to add to or remove from your fleet, and to properly rotate units.
Fleet Calculator
Navigation from your Home screen:  Search Open or Fleet > >
The on the Fleet Performance dashboard helps you gain a thorough understanding of your operation's efficiency over the past three (3) months; it shows your length of use (LOU), utilization, turn rate, and fleet size compared to recommended values for the industry. See "Fleet Calculator (Performance Dashboard)" in the glossary for more information.
Fleet Inventory & Status Breakdown
Navigation from your Home screen:
or  >
>  > Fleet Inventory section
Your Fleet Operations dashboard includes a Fleet Inventory section with a range of unit data, including a full inventory, units available, units removed from the fleet, and more. The Fleet section offers status breakdowns of units and shuttle units (if applicable ) in your fleet. Click a status tile to view a list of those records. See "Fleet Operations & Performance Dashboards" for more information.
Plate & Sticker Expirations
Navigation from your Home screen:
or > ![]() > Fleet Inventory section
> Fleet Inventory section
Be proactive about expired or expiring license plates and inspection stickers by easily locating units with license plates and inspection stickers that are expired or expiring within 30 days.
Fuel Replacement
Navigation from your Home screen:
or > 
Average Fuel Replacement and Average Fuel Replacement Cost metrics on your Fleet Performance dashboard help you to understand your location's fuel expenses and budget for future fuel usage. Browse the Fleet Performance Dashboard glossary for more information about these metrics.
Reports
While the applications offers live metrics to provide you with a snapshot of your operation and performance data, you can dig deeper with pre-defined reports and customized, build-your-own reporting.
May pre-defined reports are available, such as:
- Length of Use report. Measure the effectiveness and efficiency of your fleet, broken down by location and service advisor. See "Length of Use (LOU) Report" for more information.
- Utilization report. Evaluate the percentage of time each unit in your fleet has been in use. See "Utilization Report" for more information.
- Fleet Inventory. View a range of data for all active units at your location. See "Full Inventory Report" for more information.
You can use the following reports to get fleet information, agreement activity, appointments, availability, and more.
| Monitor Daily | Monitor Periodically | |
|---|---|---|
| Fleet |
|
|
| Appointments & Agreements |
|
|
Go Mobile
With the free iOS mobile app, you can scan drivers’ licenses and QR codes, upload insurance cards, collect e-signatures and remote signatures via email or text, and more. See "Installation & Logging In (Mobile App)" to get started.
© 2026 TSD Rental, LLC