
|
Unit inspections are available on agreements based on the Enable Agreement Inspection management setting.
Performing walkaround inspections to document the vehicle's condition is a key part of the agreement process. It helps keep fleet information up-to-date, prevents disputes with customers about pre-existing damage, ensures accountability, and maintains transparency between your location and your customers.
You can record results of your walkaround inspections directly to a unit record (if the unit is not In Use) or to an agreement, during open, view, exchange, quick return, close, and close pend.
Setup Requirements for Inspections
Unit inspections are always available for you to perform on unit records. Additional setup is required to manage inspections on agreements.
- Allow inspections on agreements. Use the Enable Agreement Inspection management setting to make inspections available on agreements.
- (Optional.) Require inspections on agreements. Use the Require Unit Inspection setting to make inspections required to open and/or close different types of agreements.
If using the new version of inspections, this setting makes inspections required to be performed on the mobile app, but you make exceptions for employees using the Override Mobile Inspection permission, in which case the employee can satisfy the inspection requirement on the web.
Inspections (Current Method)
Inspecting a unit at open and/or close agreement (including close pend) may be required, based on the Require Unit Inspection management setting.
If you notice any damage on or inside the vehicle during your inspection, you can log a damage entry so it is associated with the unit record and, if applicable, agreement. For transparency’s sake, the filled-in damage diagram is included on the customer’s printed or emailed form.
- If inspecting a unit outside of an agreement or exchange, search for the unit record in the Fleet Hub and click . If already viewing the unit record, click Inspect from the side panel.
- Select a location of damage on the diagram, or click . Existing damage records, if present, are indicated on the diagram by an orange icon (
 ).
). - Select or confirm the area of damage (Zone) and select a Damage Type.
- Indicate the severity of the damage (general or chargeable).
- (Optional.) Upload photos of the damage.
 Drag and drop an image or click
  to select one. You can upload up to 12 photos. If you want to re-upload an image, just click and upload it again.
- (Optional.) Add notes.
- Click . Verify the information and click to return the unit record, unit search results, or to the agreement or exchange, as applicable. A damage diagram is included on the customer’s printed or emailed form, with areas of damage marked with an 'X', if applicable.
Note: You cannot update miles or fuel level when performing an inspection outside of an agreement.
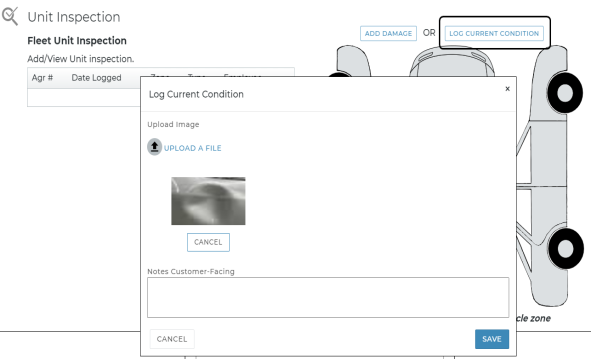
- If inspecting a unit outside of an agreement or exchange, search for the unit record in the Fleet Hub and click . If already viewing the unit record, click Inspect on the side panel.
- Click .
- On the Log Current Condition dialog, upload a photo of the unit. Drag and drop an image or click
 UPLOAD A FILE to select one. You can upload up to 12 images.
 - (Optional.) Add any additional customer-facing notes about the inspection.
- Click .
- The inspection is added to the Fleet Unit Inspection grid, with the Zone listed as "Current Condition" and the Type as "N/A".
Updates to Current Condition are logged in Inspection History, accessible via the Inspection History button on the side panel of a unit record.
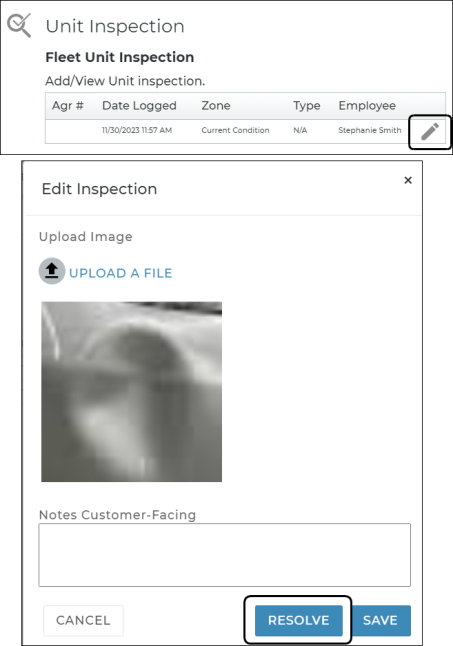
- Outside of an agreement or exchange, search for the unit record in the Fleet Hub and click . If already viewing the unit record, click Inspect on the side panel.
- Current Condition inspections are present in the Fleet Unit Inspection grid. To make edits or resolve the inspection, edit (
 ) the inspection.
 - On the Log Current Condition dialog, click .
- The inspection is removed from the Fleet Unit Inspection grid.
Updates to Current Condition are logged in Inspection History, accessible via the Inspection History button on the side panel of a unit record.
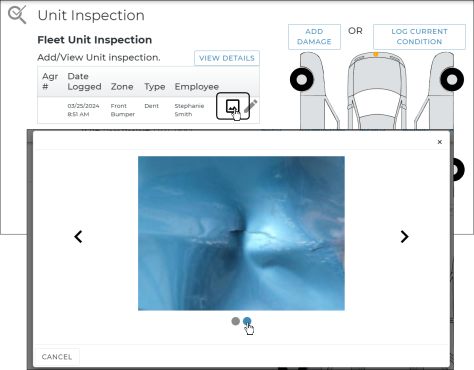
The Fleet Unit Inspection grid contains a comprehensive list of inspections performed on the unit, with a button to view more details, such as photos and notes, and print this information as a PDF.
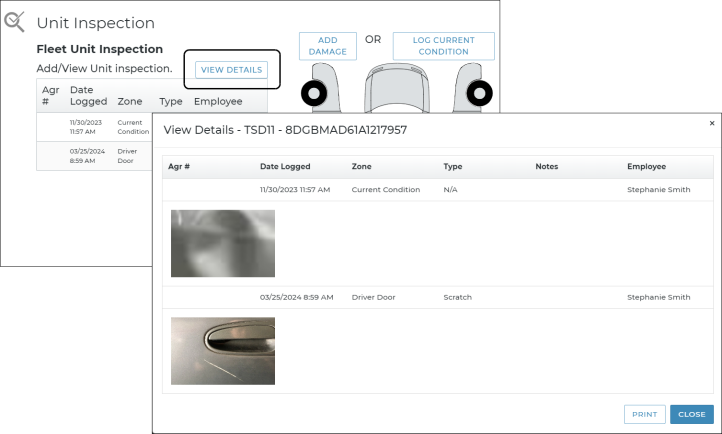
You can quickly view full-sized photos from unit inspections without needing to edit an individual damage entry, where the images are scaled down.
If photos were uploaded during an inspection, click the photo icon ( ) in the Fleet Unit Inspection grid to bring up the image slider, where you can click the arrows or the dots on the bottom to rotate through images.
A detailed account of unit inspections is available via the Inspection History button on the side panel of a unit record. This includes:
- inspections when opening and closing an agreement or during an exchange
- inspections on a unit record (through the Fleet Hub)
- maintenance or body shop status changes
- the employee and date and time of the update
Record360 integration is sold separately, and is supported on the web and mobile app (iOS only). Location setup must be completed by TSD Support. Contact your TSD Sales Representative at sales@tsdweb.com for more information.
The application offers an integration with the Record360 property inspection and documentation application that allows you to do the following on the web and mobile app:
- access photos, videos and notes for a unit's VIN from your system's Record360 account when performing an inspection on a unit record or during the agreement process.
- (mobile app only) upload photos, videos, and notes to Record360
See "Record360 Integration" for more information.
Inspections (New Version)
The new inspection experience is being rolled out gradually and may not yet be available for all locations. If you want more information or are interested in having it turned on, contact your sales representative at sales@tsdweb.com.
You can record results of your walkaround inspections to an agreement during open or exchange, viewing an open agreement, or returning a unit during close, close pend, or an exchange. You can do this any number of times on a single agreement (e.g., at open, at view, and at close).
For transparency’s sake, the marked-off damage diagram is included on the customer’s agreement form.
Note: Depending on your settings, the inspection may be required to be performed on mobile in order to open and/or close or close pend an agreement; employees may have an option to override this requirement and perform the inspection on web. See "Setup Requirements for Inspections" for more information about this requirement and how it may impact the agreement process.
The Inspections section of the agreement contains:
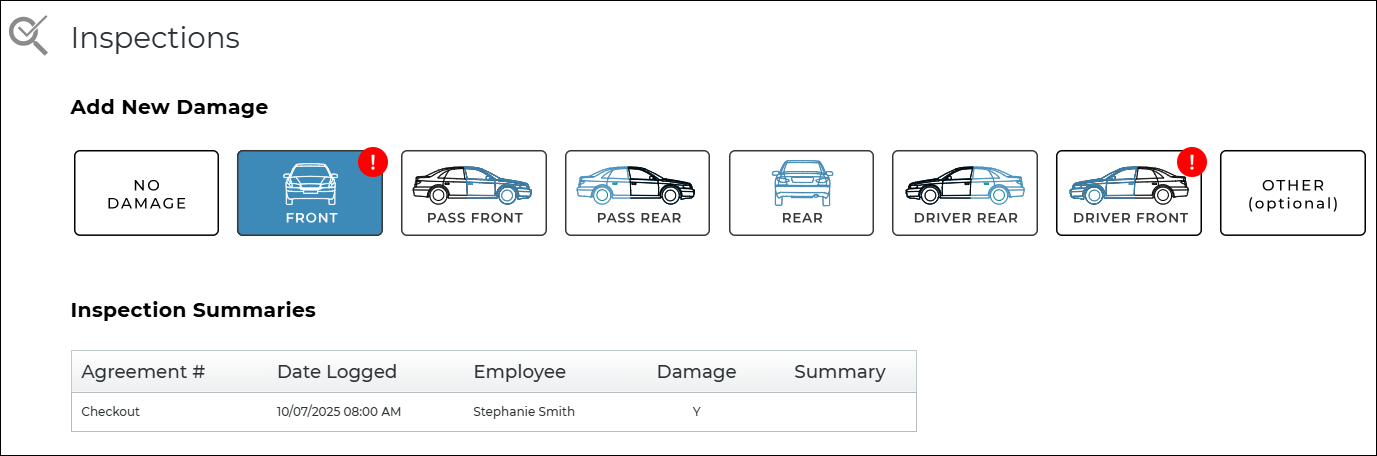
- No Damage option, available as long as damage was not previously entered for the unit on the agreement.
- Zones for adding damage, marked with a red damage icon (
 ) if damage was logged previously for the unit on this agreement.
 - Inspections Summary that contains previously-logged inspections for this agreement for reference, including Agreement # (with the state of the agreement, i.e., Checkout, View, or Close), Date Logged, Employee, Damage (Y or N), and Summary. For example, if closing an agreement, you would likely see an entry in this grid for an inspection performed at open (Agreement # = Checkout).
Inspecting a unit at open and/or close agreement (including close pend) may be required, based on the Require Unit Inspection management setting. If this is the case, the following is displayed: "INSPECTION REQUIRED, PERFORM ON MOBILE APP." You must have the Override Mobile Inspection permission to bypass this requirement and perform an inspection on the web.

Hover to view the full-sized image.
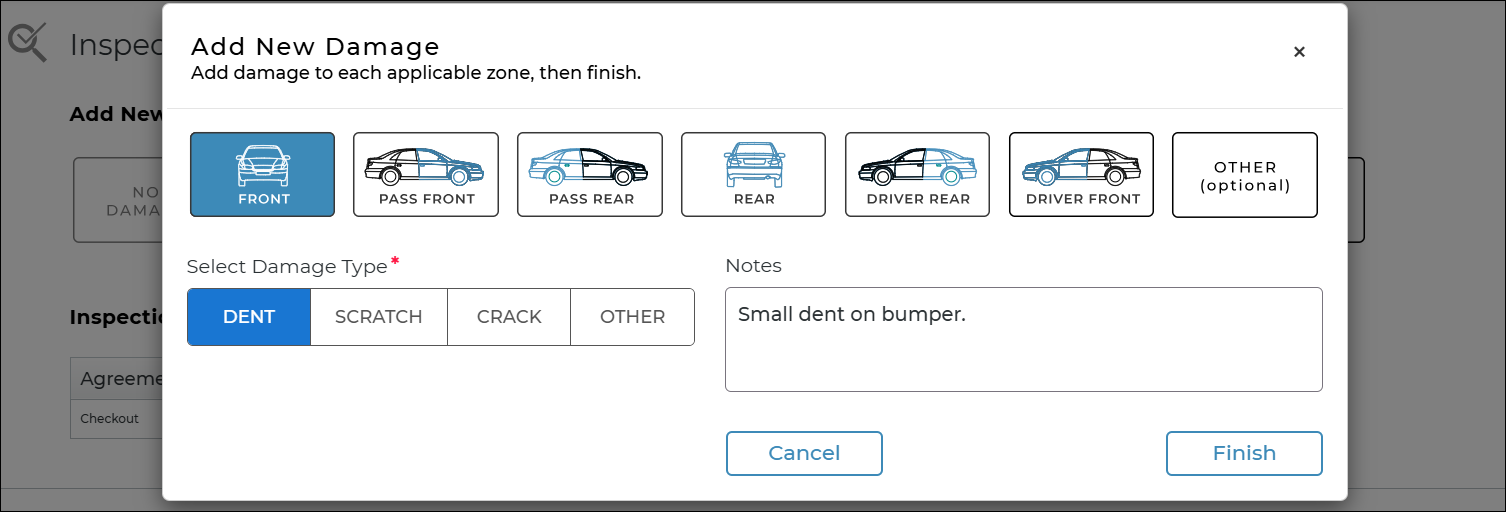
- In the Inspections section of the agreement, select No Damage (available as long as damage was not previously entered on this agreement) or choose a specific zone (e.g., Front, Passenger Front, etc.) to begin logging damage details:
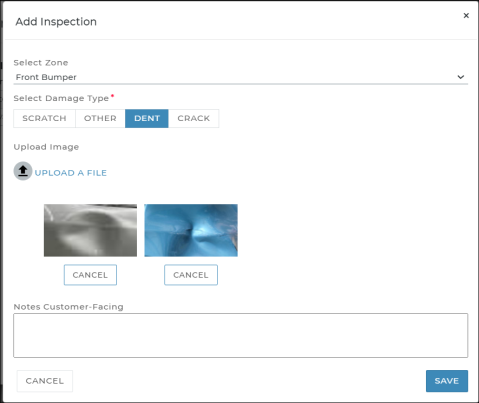
- On the Add New Damage dialog, select the Damage Type (Dent, Scratch, Crack, or Other) for the selected zone. You can only add one damage type per zone within a single inspection.
- (Optional.) Enter any additional Notes to describe the damage to that zone (e.g., Small dent on bumper).
- Select another zone, if needed, to continue adding damage.
- When completed with this inspection, click to return to the agreement, where the zones are marked by a red damage icon ().
- The inspection (damage or no damage), is logged in the Inspection Summaries grid.
Hover to view the full-sized image.
Note: If you need to clear damage that you've entered in a zone, click your damage type selection again to clear it; this removes the damage and note, if entered. If you need to clear all damage, close the dialog and select the No Damage option.
Note: If you select No Damage after adding damage, you are prompted with a "Clear All Damage" message to remove logged damage from the vehicle: "Are you sure you want to clear all damage?" Choose or to return without clearing damage.
Hover to view the full-sized image.
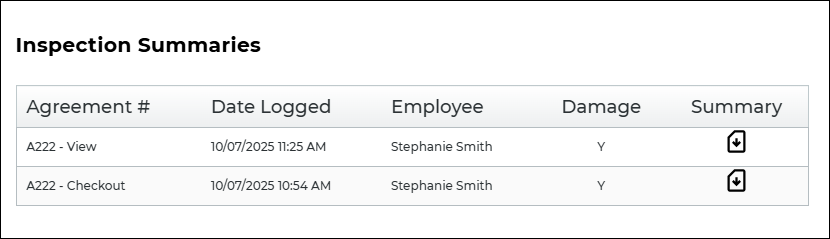
Inspection Summary
The Inspections Summary grid contains previously-logged inspections for a unit on an agreement. It is for reference only; you cannot edit previous agreement inspection entries.
The grid includes the following columns:
- Agreement #: Agreement Number and state of the agreement when the inspection was added:
- A123 - Checkout, if inspected at unit assignment at open
- A123 - View, if inspected at view agreement
- A123 - Checkin, if inspected when returning a unit at close
- A123 - Checkout Exchange, if inspected when assigning a unit during an exchange
- A123 - Return Exchange, if inspected when returning a unit during an exchange
- Date Logged: Date and time the inspection was added.
- Employee: Employee who performed the inspection.
- Damage: Y (Yes) or N (No), to indicate whether damage was recorded to a zone.
- Summary: A Summary (
 ) icon to view and print a detailed inspection summary PDF or a Photo icon () to view inspection photos, if the inspection was logged on the mobile app.
Summary Grid
Hover to view the full-sized image.
Summary PDF
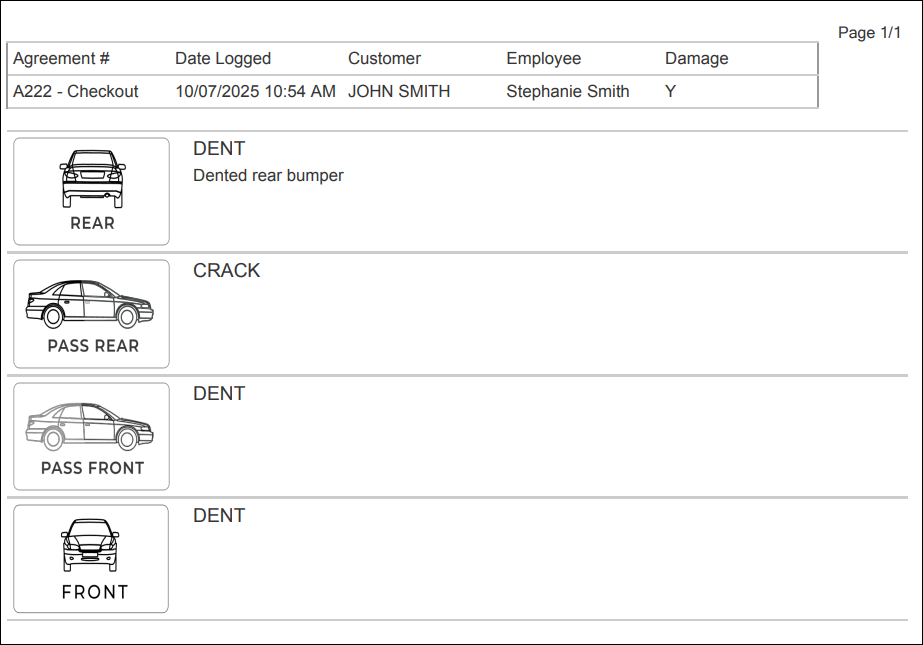
Hover to view the full-sized image.
© 2026 TSD Rental, LLC