
|
You can view and edit today's appointments, as well as open and closed agreements.
How to View an Agreement
- Start from your 'Home' screen. You can quickly view an Open or Due agreement on your Dashboard, or tap VIEW and choose one of the following
- Today's Appointments:

- Contactless List:
- Search for an agreement. Manually search for the agreement by Customer Name, Unit/Tag Number, License Plate Number, or Agreement Number. Tap Search to display a list of agreements. For narrowed results, tap one of the filter categories.license.
- Tap the record to view it. The View Agreement screen consists of five sections, denoted by the icons at the top of screen: Summary (
 ), Customer (
 ), Repair Order (
 ), Dates / Unit (
 ), and Signature (
 ).
).
How to Edit an Agreement
- Search for the agreement, as needed, and tap the record to view it. See "How to View an Agreement".
- Make your changes. Generally, the fields, validations, and options applicable on the web are also applicable here, too. You may have the following options, depending on the agreement:
- (Closed agreements) Email or print a copy of the agreement.
- (Closed agreements) Email or print an invoice for a customer or company (split invoice). See "Print or email an invoice".
- (Closed agreements) View payments, and email or print a payment receipt, if you have Credit Card Processing.
- (Closed agreements) View toll violations, and email or print receipts for toll charges, if you have Toll Processing.
- (Closed agreements) View charges, fees, and taxes, and add new fees. See "Rates, Charges, Fees, and Taxes on Appointments & Agreements".
- Add or change a credit card, if you have Credit Card Processing. See "Credit Card Processing".
Mobile View Features
Upload an Attachment
Add important communications or documents to agreements with agreement attachments. At the bottom of every agreement, you'll find an Agreement Attachment section, where you can tap Upload File. You can choose to upload a file from your photo library, take a photo with your mobile device's camera, or choose a file from your device's file explorer. The following file extensions are accepted: pdf, docx, png, jpeg, jpg, csv, xlsx, txt.
After your attachment is uploaded, you can download the file ( ) or delete it from the agreement (
 ).
).
Agreement Attachment events are recorded in the agreement's history log, accessible via the History button on the agreement.

Inspect a Unit
The availability of unit inspection on an agreement is based on the Enable Agreement Inspection management setting.
Performing walkaround inspections to document the vehicle's condition is a key part of the agreement process. It helps keep fleet information up-to-date, prevents disputes with customers about pre-existing damage, ensures accountability, and maintains transparency between your location and your customers.
You can record results of your walkaround inspections directly to a unit record (if the unit is not In Use) or to an agreement, during open, view, exchange, quick return, close, and close pend.
Record360 integration is sold separately, and is supported on the web and mobile app (iOS only). Location setup must be completed by TSD Support. Contact your TSD Sales Representative at sales@tsdweb.com for more information.
Note: A single user can only upload one inspection transaction to Record360 at a time. If a transaction is already in progress, a message is displayed for you to delete the current transaction and start a new one, or stay in the current transaction.
- In the Inspections section, tap Walkaround to open the Record360 mobile app and create a new inspection transaction.
- Select the transaction option that applies: Checkout/Open (to add a new record, if one does not exist), Add/Update (to edit an existing record), or Return/Close (to upload a final version of the record with any new damage).
- As needed, fill out the inspection checklist fields, take photos and videos, add an email address to which to send a Transaction Summary PDF, and add a customer signature to the record. Tap the Upload Record button to create a record in Record360.
- Tap Done. A transaction summary (containing a reference number) is sent to the email address, if one was provided. You can also download a Transaction Summary PDF by viewing your inspection history uploads.
Note: To cancel the current transaction and return to the mobile app, tap the delete icon and select Delete Transaction.
Inspecting a unit at open and/or close agreement (including close pend) may be required, based on the Require Unit Inspection management setting.
If you need to log unit damage during your inspection or simply upload photos or notes to log its current condition, you can do so.
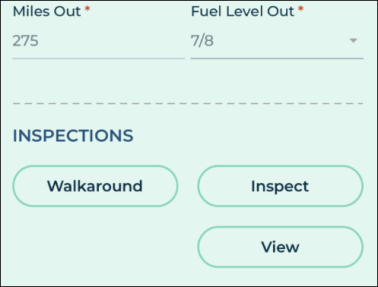
- In the Inspections section of an agreement, tap Inspect. (If viewing existing inspection entries, an Add Inspection button is also present to begin a new inspection.)
- Do one of the following, depending on the type of inspection:
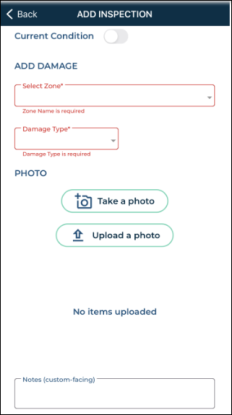
- If logging damage:
- Select or confirm the area of damage (Zone) and select a Damage Type.
- Take or upload up to 12 photos of the damage and/or add any notes, if necessary.
- Tap Save.
- If logging current condition:
- Tap the Current Condition
 toggle.
 - Take or upload a photo of the unit and/or add any notes, if necessary.
- Tap Save.

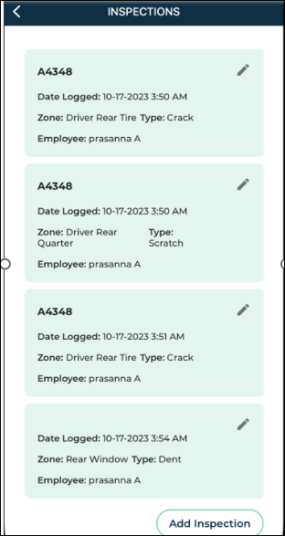
If inspections have been logged for a unit, a View button is available in the Inspections section of an agreement on the mobile app. Tap View for a detailed account of inspections, including:
-
an edit button (
 ) to edit the inspection entry. (If a photo is attached to an existing damage entry, you can tap the photo to zoom in, and swipe if there are multiple photos.)
 - the Agreement Number associated with the logged inspection, if applicable.
- the date logged.
- the zone and type of damage.
- the employee who logged the inspection entry.
Additional Drivers
You can manage additional drivers, or individuals other than the customer that are authorized to drive the unit, when opening or viewing an open agreement. See "Additional Drivers" for more information.
The number of additional drivers on the agreement cannot exceed your Maximum Drivers setting in management setting in Admin Setup.
Tap . You can choose to scan a driver's license to capture all the required information, or manually search for or add a new driver.
Tap . On the Edit Driver screen, make your changes and tap .
Tap . Confirm that you want to remove the additional driver from the agreement.
Upload an insurance card photo
Insurance information, except for the Full Insurance Coverage field, if displayed at your location, may be required on an agreement based on the Require Insurance Information management setting. To meet this requirement, you can fill in the insurance fields, upload a photo of the insurance card, or both. Additionally, an Expiration Date for an uploaded insurance card may be required on an appointment or agreement based on the Insurance Card Expiration Required management setting.
Note: Even if insurance information is on file for a customer or on an appointment, insurance information may be cleared on every new agreement, by default, based on the Require New Insurance Information management setting.
- If necessary, tap the option to hide the insurance fields. (If the customer already has an insurance card on file, this is switched on, by default, and the photos are visible.)
- Upload front and back photos of the insurance card, or take photo using your mobile device's camera.
- Enter an Expiration Date, if required for your location, based on the Insurance Card Expiration Required management setting.
- (Optional.) Add any additional Insurance Notes, if necessary.
- When a photo is present on the agreement, and buttons are available. Tap a photo to enlarge it. Even when the option is toggled off, your photos are present on the agreement unless you delete them.
Add a customer automobile
A customer automobile may be required on an agreement, based on the Require Customer VIN management setting.
In the Repair Order section ( ) of an agreement, you can add a new customer vehicle, or select a customer vehicle from the Vehicles On File list. An button is available to edit vehicle information, if needed.
- Tap . You can choose to scan the barcode or QR code for the customer's VIN, or manually enter vehicle information. Some unit information, such as the Year, Make, and Model, may be filled in based on its VIN by the integrated VIN validation service, ChromeData. In this case, if the VIN is decoded to be invalid, a message is displayed: "Customer VIN is not recognized, please confirm the VIN is accurate."
- Add any notes and indicate whether this is the customer's primary vehicle.
- Tap to add this vehicle to the agreement and update the customer record, accordingly.
Add Delivery and Collection information
For locations with Delivery and Collection integration, a Delivery and Collection section is available in the Customer section ( ) of the agreement for you to add delivery and collection addresses. See "Delivery & Collection (Mobile App)" for more information.
Split an invoice between a customer and a company
When only a daily rate is applied to agreement charges, an button is available for cases when a third party company, such as an insurance company, is responsible for some or all of the agreement's daily rate charges, and, if you choose, taxes on its portion of the rate charges. That way, you can generate two invoices: one to send to a billing company, and to provide to the customer (driver). See "Split Invoices with Billing Companies" for more information.
Credit Card Processing
Contact your TSD Sales Representative at sales@tsdweb.com to get started with TSD DEALER's integrated Credit Card Processing.
Pre-authorizations are only available if configured within the Credit Card Capture Required at Open and Pre-Authorizations Settings management setting.
Note: For important information and notes regarding pre-authorizations, including setups, see "Pre-Authorizations" in the "Credit Card Processing" topic.
![]() Read more: What is a Pre-Authorization?
Read more: What is a Pre-Authorization?
- Capture a credit card on the agreement. During the open agreement process, or while editing the opened agreement, capture a credit card to be pre-authorized. See "Capture a credit card".
- Toggle on the Pre-Authorize option. Toggle on Pre-Authorized
 , if not selected by default; if opening a new agreement, the pre-authorization will not be performed until save.
 - Complete (save) the open agreement. At save, the system automatically processes a pre-authorization on the customer's card. The total pre-authorized amount is displayed next to the card details. This amount includes both the main pre-authorization for agreement charges (i.e., rates, fuel charges, fees, and taxes), as well as the secondary pre-authorization for toll charges, if applicable.
Note: The application displays a pre-authorization error message if the pre-authorization attempted against a credit card is declined, so you can collect another form of payment, if needed. (For example: "No credit card on file" or "Failure trying to submit transaction for Credit Card Processing - Your card was declined.")
Capturing a credit card is the first step to charging. From there, you can pre-authorize the card to hold funds for charges, save the card to the customer's profile, and bill for toll charges, depending on your exact integration.
A payment will not be taken against a captured credit card until you close the agreement.
With the mobile app, you can capture a credit card on agreement by manually entering card information or, if supported by your credit card provider, a supported mobile card reader. See "Supported Devices and Peripherals" for more information about supported devices.
Note: The default method of credit card entry (manual or device) is based on your mobile settings (![]() ).
).
- On the agreement, choose whether you want to manually enter a card, or use a supported card reader.
- Manually enter a credit card:
- Tap .
- In the credit card capture iFrame, enter the required billing information.
- Tap . If successful, a token is generated for the credit card and the card is added to the agreement, replacing any previous card associated with the agreement. Key card information (card type, last four digits, and expiration date) is displayed (e.g., visa: xxxx-xxxx-xxxx-4747 Exp. 05/28).
- (CenPOS) Capture a card using an ingenico ICMP mobile card reader:
- (Stripe) Capture a card using a mobile card reader.
- Now that a credit card is captured on the agreement, you may have several other options, depending on your integration and employee role's permissions:
- Have a pre-authorization automatically taken against the card for charges (at save, if opening a new agreement, or at the time the card is captured, if viewing an agreement). Toggle on Pre-Authorize.
- Save this credit card to the customer's record for future appointments and agreements. Toggle on Save Credit Card to Customer Profile.
- Bill the credit card for any future toll charges incurred on the agreement. Toggle on Charge Violations to Customer.
Pre-authorizations are only available if configured within the Credit Card Capture Required at Open and Pre-Authorizations Settings management setting.
Note: For important information and notes regarding pre-authorizations, including setups, see "Pre-Authorizations" in the "Credit Card Processing" topic.
![]() Read more: What is a Pre-Authorization?
Read more: What is a Pre-Authorization?
- Capture a credit card on the agreement. During the open agreement process, or while editing the opened agreement, capture a credit card to be pre-authorized. See "Capture a credit card".
- Toggle on the Pre-Authorize option. Toggle on Pre-Authorized , if not selected by default; if opening a new agreement, the pre-authorization will not be performed until save.
- Complete (save) the agreement. At save, the system automatically processes a pre-authorization on the customer's card. The total pre-authorized amount is displayed next to the card details. This amount includes both the main pre-authorization for agreement charges (i.e., rates, fuel charges, fees, and taxes), as well as the secondary pre-authorization for toll charges, if applicable.
Note: The application displays a pre-authorization error message if the pre-authorization attempted against a credit card is declined, so you can collect another form of payment, if needed. (For example: "No credit card on file" or "Failure trying to submit transaction for Credit Card Processing - Your card was declined.")
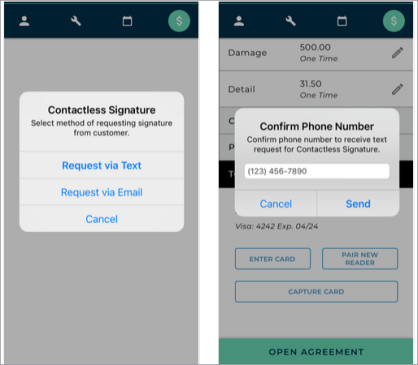
Collect a signature (Contactless, Electronic, Delivery & Collection, or Hard Copy)
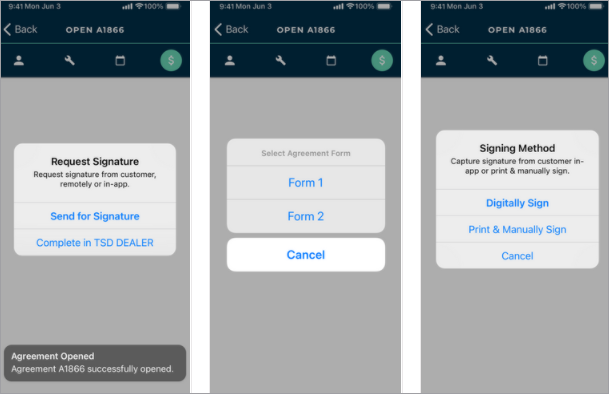
After saving an open agreement, the app displays a prompt for you to select an agreement form and collect a signature. You may have the following signature capture options:
- On the Request Signature prompt, tap Send for Signature.
- Select an agreement form.
- On the Contactless Signature prompt, select the method of requesting a signature from the customer: Request via Text or Request via Email, depending on whether the customer's phone is filled in and Text Allowed is enabled (for texting), or the customer's email address is filled in (for emailing).
- Confirm the phone number or email address and tap . See "Contactless Agreements: Remote Signatures" for more information.
If Signature Capture is available for your location, you can capture a signature electronically, on the device.
This feature can only be configured by TSD. Contact TSD Support at support@tsdweb.com for more information. TSD DEALER's Easy Customer Signature feature is the fastest and most efficient way to collect an electronic or contactless signature. With Easy Signature, customers only need to tap a single toggle and sign once to acknowledge all terms and conditions of the agreement. See "Collect an Easy Customer Signature" for the process.
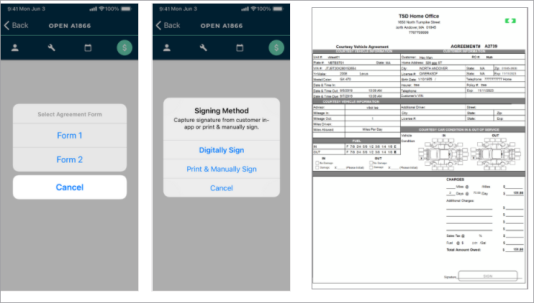
- On the Request Signature prompt, tap Complete in TSD DEALER.
- Select an agreement form.
- On the Signing Method prompt, select Digitally Sign as the signature method and do the following:
-
On the agreement form, request a digital signature or acknowledgment (if applicable) from the customer in each required signing area.
Note: Abandoning the digital signature capture process (by tapping ) displays the following message: "You are attempting to leave the agreement signature, any captured signatures will not be saved. Do you want to continue?" Click to proceed without saving the signature or to remain on the signature form screen.
- If your form is set up with signature check boxes, tapping
 or
or  adds a check mark (
 ) in place of a signature. The acknowledgment is displayed on the email and printed versions of the form.
 - If your form requires the customer to sign on-screen, tapping or displays an enlarged signature box with and buttons.
- If an additional driver is present on the agreement, a signature area is available for the driver to sign.
- If your form is set up with signature check boxes, tapping
- When all required fields are signed or acknowledged, tap to save the signed agreement form and open a PDF to print.
- Confirm the phone number or email address and tap . See "Contactless Agreements: Remote Signatures" for more information.
- If your location uses automatic texts or emails, a copy of the signed agreement form is texted or emailed to the customer, as applicable.
This feature must be turned on by TSD Support. Contact TSD Support at support@tsdweb.com for more information.
For locations with the Easy Customer Signature feature, you can implement an even faster and more efficient electronic signature process. Customers only have to tap a single toggle and sign once to acknowledge all terms and conditions of the agreement.
- On the Request Signature prompt, tap Complete in TSD DEALER.
- Select an agreement form.
- On the Signing Method prompt, select Digitally Sign as the signature method.
- The Sign Agreement screen contains a single acceptance toggle is available to acknowledge all terms and conditions of the agreement, and, if selected, a box to provide a signature. (The following text is present above the signature box: "By signing below, I am acknowledging that I have read and agree to all of the terms outlined in the dealership's vehicle use agreement." (The "dealership's vehicle use agreement" portion is a direct link to the agreement PDF.)
- Once the customer provides a signature, tap Save to save the signed agreement, or Save & Print to save and open the PDF. Options are also available go back to return to the previous screen, and Clear to clear the signature, if needed.
- Once saved:
Note: Depending on your manufacturer’s settings, an additional optional or required clause toggle may be available (e.g., to have the customer opt in to receive marketing materials).
- The captured signature is placed on all designated signature and initial areas, and any field on the agreement form designated as a check box will automatically be selected.
- If your location uses automatic texting or emailing, a copy of the signed agreement form is texted or emailed to the customer, as long as the customer has opted to receive texts or emails, respectively. See "Automatic Texting and Emailing" for more information.
- The signed agreement form PDF is saved the agreement and available in the Agreement Files section of the agreement for emailing, printing, and downloading.

A partner integration and setup by TSD is required before using a third party driver app component of the Delivery and Collection integration. Contact your TSD Sales Representative at sales@tsdweb.com for more information.
If your location is using Delivery and Collection feature with a third party driver app component, you can send the agreement form to your provider's app to obtain a customer signature. See "Delivery & Collection (Mobile App)" for more information.
- If opening or viewing the agreement, make sure Delivery and Collection is enabled (
 ) and verify the following information, as applicable:
 - Delivery address. You can select the
 Home Address check box to use the customer's address from the appointment.
 - Collection address. You can select the Home Address check box to use the customer's address from the appointment, or the Delivery Address check box to use the same address as the Delivery Address.
- Collection date and time, if necessary, when the assigned unit will be collected from the customer.
- After selecting an agreement form, instead of collecting a signature to complete the open agreement process, click to send the agreement form (in the form of a PDF or a contactless URL, depending on your provider) to your provider's app to obtain a customer signature. The agreement's status is set to Incomplete.
- The provider processes the received agreement information and obtains a customer signature. The provider may update the fuel and mileage of the assigned unit, as necessary.
- The provider sends TSD DEALER the signed agreement form PDF, which is attached to the agreement. The following occurs:
- The agreement's status changes from Incomplete to Open.
- The agreement's Checkout Date is updated to the date and time the agreement form was received from your provider, and the Miles Out and Fuel Level Out are updated, if applicable.
- The received signed agreement event is logged in the agreement's History. See "Unit History (Event Logging)" for a list of events logged in a record's history.
- On the Request Signature prompt, tap Complete in TSD DEALER.
- Select an agreement form.
- On the Signing Method prompt, select Print & Manually Sign.
- A PDF opens for you to print, so you can capture the customer's signature on a hard copy.
- If your location uses automatic texts or emails, a copy of the unsigned agreement form is texted or emailed to the customer, as applicable.
© 2026 TSD Rental, LLC