You can process a returning unit and close the agreement.
Key Benefits for Mobile Closes
- Efficiency and speed. Process returning units on-the-spot by scanning barcodes and quickly logging vehicle inspections, mileage, and fuel, allowing for faster turnaround times for your fleet.
- Enhanced customer experience. Reduce customer wait times when it comes to returns, making them more eager to come back.
- Save time and reduce errors. Scan unit barcodes to process returns.
How to Close an Agreement
- Begin the close process from your 'Home' screen. You can quickly close from an Open or Due agreement on your Dashboard, or tap CLOSE and scan a unit or manually search for an agreement:
- Fill in all required information, marked with red asterisks (*). Generally, the required fields, validations, and options applicable on the web are also applicable here, too.
- Verify the return date and time.
- Verify repair order details.
- Verify returning unit information, such as the Miles In and Fuel Level In.
- Inspect the returning unit. See "Inspect a Unit" in this topic for more information.
- Review charges, fees, surcharges, and taxes, as applicable. The grid displays your location's applicable rates, fuel charges, mileage charges, auto-applied fees, surcharges, and taxes. You can do any of the following:
- Split the invoice between the customer and a company.
- Edit charge amounts.
- Edit fees.
- Add write offs to the customer portion of the bill.
- Charge tolls to the customer. If your location uses Credit Card Processing for tolls, toggle the Charge Violations to Customer option to bill any tolls / violations incurred on the agreement to the customer's credit card. Otherwise, they will be billed to your location.
- Add a credit card. If your location uses integrated Credit Card Processing for agreement charges and/or tolls, you can do the following:
- Add or update a credit card. For locations with the Credit Card Capture Required at Open Agreement management setting turned on, capturing a credit card is required to complete the open agreement process. For employee roles with the Allow Override Credit Card Capture permission, capturing a card is optional.
- Save the credit card so it is on file for the customer's future appointments and agreements.
- Have a pre-authorization taken against the card, if configured for your location.
- Close the agreement. Tap CLOSE to complete (save) the return. A copy of the agreement is sent to the customer if automatic emails or texts are enabled for your location and the customer has opted to receive emails or texts.
-
Note: Other buttons may be available, such as Close and Print Receipt if a payment has been made and the customer has not opted to receive emails, as well as Close Pend, to prevent any further charges from accruing and return the unit to its default status. See "Close Pend an agreement" for more information.
- Return to the 'Home' screen. After the agreement is closed, you are returned to the Home screen.
Mobile Close Features
Close Pend an agreement
The availability of Close Pend is based on the Enable Close Pending Agreements management setting.
Notes:
- You cannot Close Pend shuttle agreements.
- If a unit is associated with a Close Pend agreement, it cannot be removed from the fleet until the agreement is officially closed.
Close pending an agreement prevents any further rate, fuel charges, or fees from accruing and returns the unit to its default status (such as Ready).
You might place an agreement on Close Pend for any number of reasons; for example, if the customer returns the unit but is contesting the bill. In this situation, close pend is a way for employees to put the agreement aside until a manager can resolve the dispute.
You may also close pend an agreement if the customer returns the unit, but the billing authorization is still pending. When you close pend the agreement, the unit can be returned, but the daily charge totals are not affected until you receive the authorization.
- If close pending an agreement from the Home screen (as opposed to a quick return), tap CLOSE.
- On the Close Agreement screen, tap
- On the Close Pending dialog, verify the Return Date, Miles, and Fuel Level, if necessary then enter a Reason. Depending on your integrations, Miles In and Fuel Level In may be automatically filled in. Refer to the "Miles In" and "Fuel Level In" glossary definitions for more information about how these fields are impacted by TSD Telematics (Connected Car integration).
- Tap . If you were performing a quick return, you are returned to the New Agreement screen with the newly released unit assigned.
Upload an Attachment
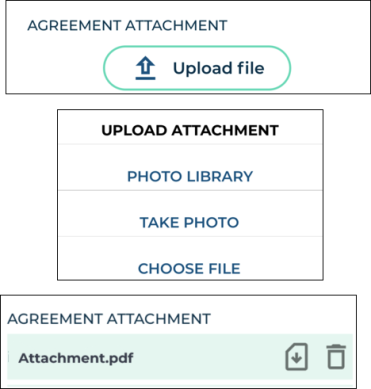
Add important communications or documents to agreements with agreement attachments. At the bottom of every agreement, you'll find an Agreement Attachment section, where you can tap Upload File. You can choose to upload a file from your photo library, take a photo with your mobile device's camera, or choose a file from your device's file explorer. The following file extensions are accepted: pdf, docx, png, jpeg, jpg, csv, xlsx, txt.
After your attachment is uploaded, you can download the file ( ) or delete it from the agreement (
 ).
).
Agreement Attachment events are recorded in the agreement's history log, accessible via the History button on the agreement. See "Unit History (Event Logging)" for more information.
Inspect a Unit
The availability of unit inspection on an agreement is based on the Enable Agreement Inspection management setting.
Performing walkaround inspections to document the vehicle's condition is a key part of the agreement process. It helps keep fleet information up-to-date, prevents disputes with customers about pre-existing damage, ensures accountability, and maintains transparency between your location and your customers.
You can record results of your walkaround inspections directly to a unit record (if the unit is not In Use) or to an agreement, uploading photos and marking areas of damage on the vehicle or logging its current condition, as needed.
Record360 integration is sold separately, and is supported on the web and mobile app (iOS only). Location setup must be completed by TSD Support. Contact your TSD Sales Representative at sales@tsdweb.com for more information.
Note: A single user can only upload one inspection transaction to Record360 at a time. If a transaction is already in progress, a message is displayed for you to delete the current transaction and start a new one, or stay in the current transaction.
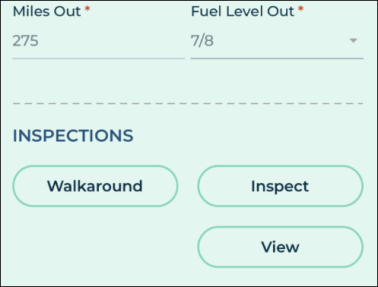
- In the Inspections section, tap Walkaround to open the Record360 mobile app and create a new inspection transaction.
- Select the transaction option that applies: Checkout/Open (to add a new record, if one does not exist), Add/Update (to edit an existing record), or Return/Close (to upload a final version of the record with any new damage).
- As needed, fill out the inspection checklist fields, take photos and videos, add an email address to which to send a Transaction Summary PDF, and add a customer signature to the record. Tap the Upload Record button to create a record in Record360.
- Tap Done. A transaction summary (containing a reference number) is sent to the email address, if one was provided. You can also download a Transaction Summary PDF by viewing your inspection history uploads.
Note: To cancel the current transaction and return to the mobile app, tap the delete icon and select Delete Transaction.
Inspecting a unit at open and/or close agreement (including close pend) may be required, based on the Require Unit Inspection management setting.
If you need to log unit damage during your inspection or simply upload photos or notes to log its current condition, you can do so.
- In the Inspections section of an agreement, tap Inspect. (If viewing existing inspection entries, an Add Inspection button is also present to begin a new inspection.)
- Do one of the following, depending on the type of inspection:
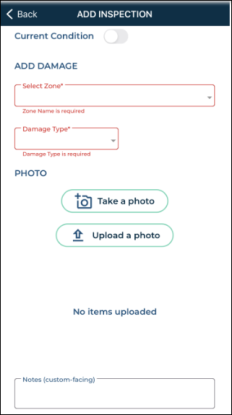
- If logging damage:
- Select or confirm the area of damage (Zone) and select a Damage Type.
- Take or upload up to 12 photos of the damage and/or add any notes, if necessary.
- Tap Save.
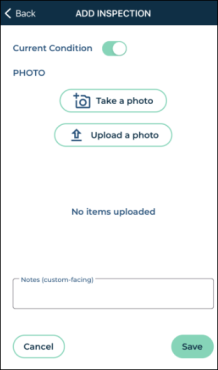
- If logging current condition:
- Tap the Current Condition
 toggle.
 - Take or upload a photo of the unit and/or add any notes, if necessary.
- Tap Save.
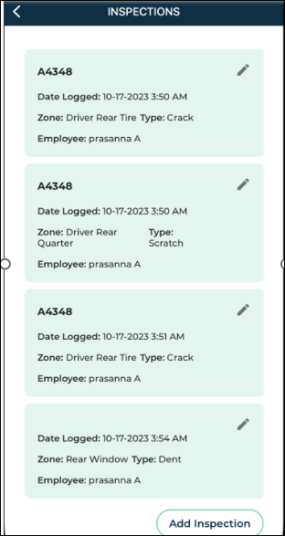
If inspections have been logged for a unit, a View button is available in the Inspections section of an agreement on the mobile app. Tap View for a detailed account of inspections, including:
-
an edit button (
) to edit the inspection entry. (If a photo is attached to an existing damage entry, you can tap the photo to zoom in, and swipe if there are multiple photos.)
- the Agreement Number associated with the logged inspection, if applicable.
- the date logged.
- the zone and type of damage.
- the employee who logged the inspection entry.
Split an invoice between a customer and a company
When only a daily rate is applied to agreement charges, an button is available for cases when a third party company, such as an insurance company, is responsible for some or all of the agreement's daily rate charges, and, if you choose, taxes on its portion of the rate charges. That way, you can generate two invoices: one to send to a billing company, and to provide to the customer (driver). See "Split Invoices with Billing Companies" for more information.
Add Write Offs
At close, you can waive an amount due from the customer's bill with write-offs. See "Write Offs" for more information about write offs, including rules and restrictions.
Your employee role must have the Add Write Offs permission to add or remove write offs.
Credit Card Processing
Contact your TSD Sales Representative at sales@tsdweb.com to get started with TSD DEALER's integrated Credit Card Processing.
With TSD DEALER's integrated credit card processing, you can securely collect a customer's credit card and bill for agreement charges (i.e., rates, fuel, mileage, and fees), and/or toll charges, if you have Toll Processing.
Credit card transactions are performed on an 'iFrame', a secure dialog on which all cards on file are assigned a ‘token,’ or a unique code that replaces sensitive PCI card data. The system stores only the card token, protecting sensitive card data against misuse.
Note: If you use Toll Processing integration only (i.e., credit card processing for toll charges only, not for agreement charges), you can only capture a credit card for the purposes of charging for tolls, not agreement charges. See "TSD Toll Connect: Toll Processing" for more information about toll processing.
If you plan to use a Stripe M2 Reader during the mobile agreement process, you must use Bluetooth to pair the reader with your mobile device.
- Make sure you've allowed Bluetooth to use the card reader on your mobile device.
- Make sure the card reader device is powered on, charged to more than 50%, and in range to your mobile device.
- In the mobile app, navigate to Settings (
 ) > PAIR BBPOS READER. (A option is also available during the mobile open process.)
 - If a card reader device is already paired and connected, the app displays a message: "Are you sure you want to pair another device? Current device will be disconnected." Tap OK to continue pairing another device.
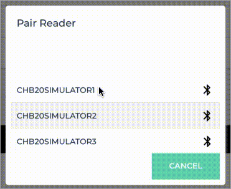
- On the Pair Reader dialog, choose the Device ID of the card reader.
- The system first checks whether a firmware update is available for the device, and whether the update is required or optional.
- If required, the update will begin installation automatically.
- If optional, an Optional Update message is displayed: "There's an update for this reader device's firmware from [Version] to the [Latest Version]. It should take approximately 1 to 2 minutes. Do you wish to update?" Tap Yes to continue updating the device, or No to return to the agreement without updating the device at this time. Note that the update may become required in the future.
- If performing a firmware update, the update may take 1 to 2 minutes. The card reader's LED light next to the power button rapidly flashes blue and orange when it begins installing a software update. A message is displayed when the firmware update is successful. When the card reader is ready to use, the LED light will return to a slow blinking blue light.
- If pairing is successful, the Device ID of the connected chip reader is also displayed below the Charges grid. You can now use the device to take payments.

Capturing a credit card is the first step to charging. From there, you can pre-authorize the card to hold funds for charges, save the card to the customer's profile, and bill for toll charges, depending on your exact integration.
A payment will not be taken against a captured credit card until you close the agreement.
With the mobile app, you can capture a credit card on agreement by manually entering card information or, if supported by your credit card provider, a supported mobile card reader. See "Supported Devices and Peripherals" for more information about supported devices.
Note: The default method of credit card entry (manual or device) is based on your mobile settings ( ).
).
- On the agreement, choose whether you want to manually enter a card, or use a supported card reader.
 Manually enter a credit card:
 - Tap .
- In the credit card capture iFrame, enter the required billing information.
- Tap . If successful, a token is generated for the credit card and the card is added to the agreement, replacing any previous card associated with the agreement. Key card information (card type, last four digits, and expiration date) is displayed (e.g., visa: xxxx-xxxx-xxxx-4747 Exp. 05/28).
 (CenPOS) Capture a card using an ingenico ICMP mobile card reader:
 (Stripe) Capture a card using a mobile card reader.
- Now that a credit card is captured on the agreement, you may have several other options, depending on your integration and employee role's permissions:
- Have a pre-authorization automatically taken against the card for charges (at save, if opening a new agreement, or at the time the card is captured, if viewing an agreement). Toggle on Pre-Authorize.
- Save this credit card to the customer's record for future appointments and agreements. Toggle on Save Credit Card to Customer Profile.
- Bill the credit card for any future toll charges incurred on the agreement. Toggle on Charge Violations to Customer.
Pre-authorizations are only available based on the Credit Card Capture Required at Open and Pre-Authorizations Settings management setting (Enable Pre-Authorizations toggle).
Note: For important information and notes regarding pre-authorizations, including setups, see "Take a Pre-Authorization" in the "Credit Card Processing" topic.
![]() Read more: What is a Pre-Authorization?
Read more: What is a Pre-Authorization?
- Capture a credit card on the agreement. During the open agreement process, or while editing the opened agreement, capture a credit card to be pre-authorized. See "Capture a credit card".
- Toggle on the Pre-Authorize option. Toggle on Pre-Authorized
 , if not selected by default; if opening a new agreement, the pre-authorization will not be performed until save.
 - Complete (save) the agreement. At save, the system automatically processes a pre-authorization on the customer's card. The total pre-authorized amount is displayed next to the card details. This amount includes both the main pre-authorization for rates, fuel charges, fees, and taxes, as well as the secondary pre-authorization for toll charges, if applicable.
Note: The application displays a pre-authorization error message if the pre-authorization attempted against a credit card is declined, so you can collect another form of payment, if needed. (For example: "No credit card on file" or "Failure trying to submit transaction for Credit Card Processing - Your card was declined.")
Note: This feature is not available if you have Toll Processing only (i.e., credit card processing for toll charges only, not agreement charges), since charging for tolls is automated when tolls are incurred. See "TSD Toll Connect: Toll Processing" for more information.
If you have integrated credit card processing for agreement charges, you can process a payment against a captured credit card at close agreement, or after an agreement is closed (for newly-added fees only).
When processing a payment at close, if a pre-authorization was already taken, these funds, up to the amount due, will be used as payment.
- Begin the close agreement process. Fill out the returning information and review charges, as needed.
- Add or change the credit card, if necessary. Capture a credit card to be charged. See "Credit Card Processing" for instructions.
- Choose whether to pre-authorize the captured credit card. If your location is set up to take pre-authorizations, select the Pre-Authorize toggle. (The actual pre-authorization will be processed at save.) See "Take a pre-authorization" for more information.
- Using Toll Processing? Choose who is responsible for toll charges: the customer or your location. If your location is set up for Toll Processing, you can toggle on Bill Violation Charges to charge tolls to the customer's credit card, or leave it off to bill them to your location. See "TSD Toll Connect: Toll Processing" for more information.
- Process the payment. Tap . On the Submit a Payment dialog, adjust the payment amount, if necessary; by default, the payment is set to the amount owed by the customer. Tap to process the payment, either directly on the card or from a pre-authorization, if one was taken.
- The payment is processed. If the payment is successful, the Total Due is updated to 0.00, and a Payments row is added to the Charges grid.
- Complete your close agreement process.
Note: In order to process a payment, the Total Due for the customer must exceed $0.49, due to a $0.50 transaction fee on the location or dealer side.
© 2026 TSD Rental, LLC


 ).
).