
|
TSD's Delivery and Collection: Customer Vehicle Transfers (CVTs)
Delivery and Collection with TSD is a paid module. Contact your TSD Sales Representative at sales@tsdweb.com for more information.
TSD's Delivery and Collection module accommodates Customer Vehicle Transfer (CVT) appointments and agreements, when a customer wants service pickup and return of his or her automobile but doesn't need a loaner or rental vehicle.
This type of record tracks the pickup and/or return of the customer's automobile being serviced, but has no unit from your fleet associated with it. So, what does that mean? A few things:
- You don't have to fill in as many details. Unit, rate, and model group information is unnecessary for customer vehicle pickup and return.
- Drivers have a shorter trip checklist. For CVTs, the mobile app trip checklist contains less toggle steps than a Delivery or Collection.
- Pickup / Return versus Delivery / Collection. CVTs involve pickup and return of a customer's automobile, not delivering and collecting a unit from your fleet. Fields, such as pickup / return address, drivers, etc., are labeled accordingly.
The CVT Process: Pickup & Return the Customer's Vehicle
The cross-platform flexibility of TSD's Delivery and Collection module caters to your individual process by supporting several different business scenarios. For instance, you may access an agreement on the web and send a notification to the customer that their driver is on the way, or you can have the driver perform this step using the mobile app trip checklist.
CVT Pickup and Return (Mobile)
Step 1. Book an appointment.
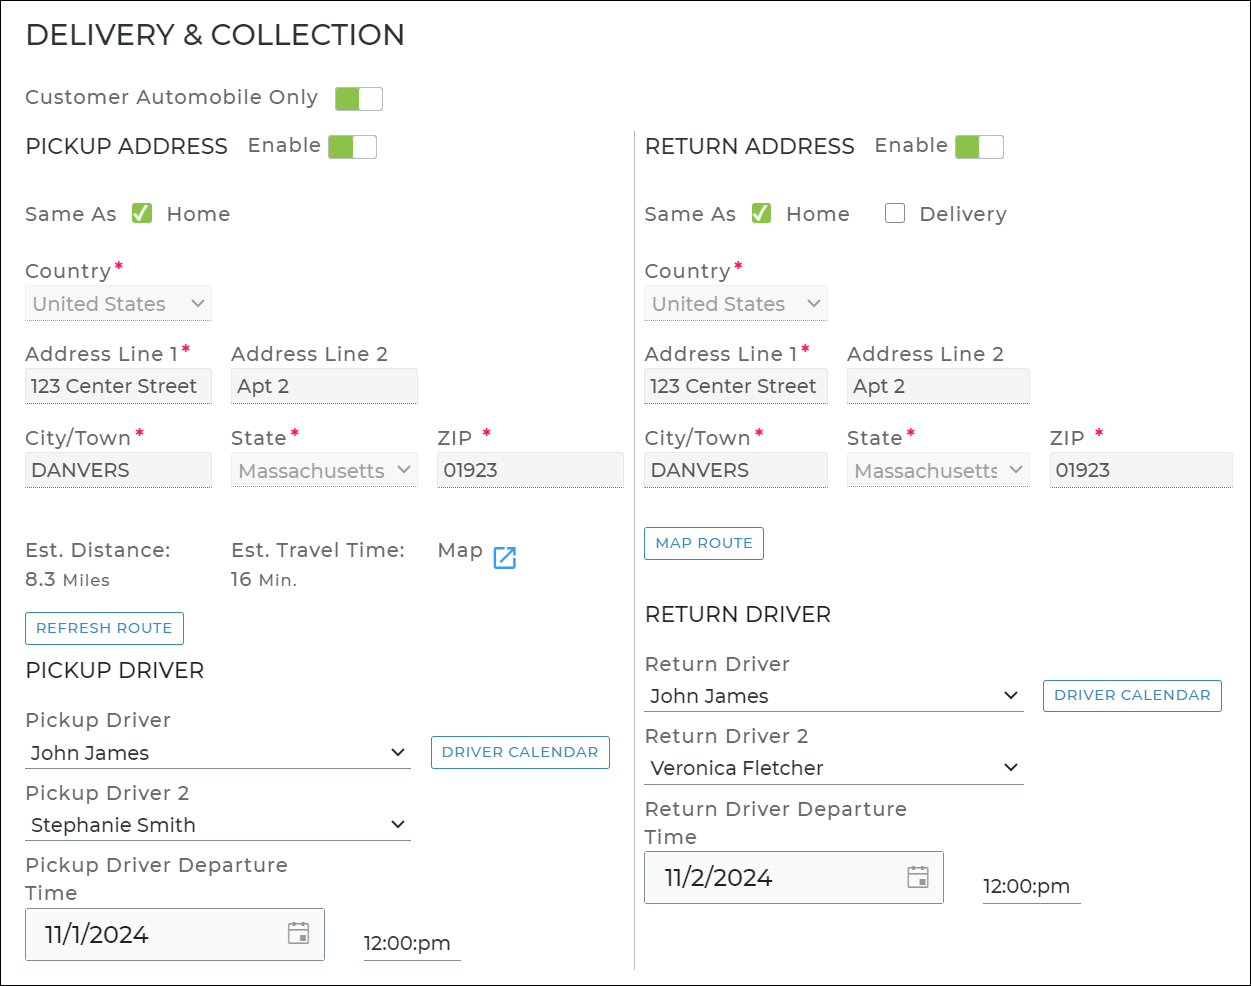
CVT appointments have Customer Automobile Only toggled on in the Delivery & Collection section, and contain pickup and/or return address information, driver(s), and driver departure time.
Note: Even though you're using the mobile app for CVT pickups and returns, appointments must be created either directly in TSD DEALER on the web, or through your integrated web scheduler. Once booked, you can open an agreement or start a trip from the mobile app.
- Create an appointment on the web (
 > New CVT Appointment.)
 - In the Delivery & Collection section of the appointment, toggle on the Delivery Address and/or Collection Address toggles. This exposes Customer Automobile Only toggle.
- Turn on the Customer Automobile Only toggle. This updates the field labels from delivery / collection to pickup / return.
- Toggle on Pickup Address and/or Return Address, as needed, and fill in the address(es). (For pickup, you can select the Home check box to set the address to the customer's home address on the appointment, and for return, you can select either the Home or Pickup check box to set the return address.)
- (Optional.) Tap to view the estimated distance and travel time from your location to the customer's destination, as well view the route on a map (
 ).
). - For pickups, select a main Pickup Driver and additional chase Pickup Driver 2, if applicable. For returns, select a main Return Driver and additional chase Return Driver 2.
- For pickups, select the Pickup Driver Departure date and time. For returns, select the Return Driver Departure date and time.
- Complete and save the appointment.
Note: Note that mapping the route sets the driver departure dates / times to the Checkout / Return Date and Time, minus the travel time, by default.
A button is available to view scheduled trips for drivers on departure date (or today's date, if no date is selected), with the option to change the date to check availability for a different day.
Note: Pickup and return departure dates/times are set, by default, to the Checkout Date /Time and expected Return Date / Time, respectively. If the route is mapped (manually via or automatically, if applicable), they reflect the Checkout / Return Date/Time subtracted by the estimated travel time.
Hover to view the full-sized image.
What happens next?
- If you use Auto Texting and Emails for appointment notifications, an email and/or text confirmation is sent to the customer. If you also use Expedited Appointments, that email / text also includes a link to access the appointment form and submit information in advance.
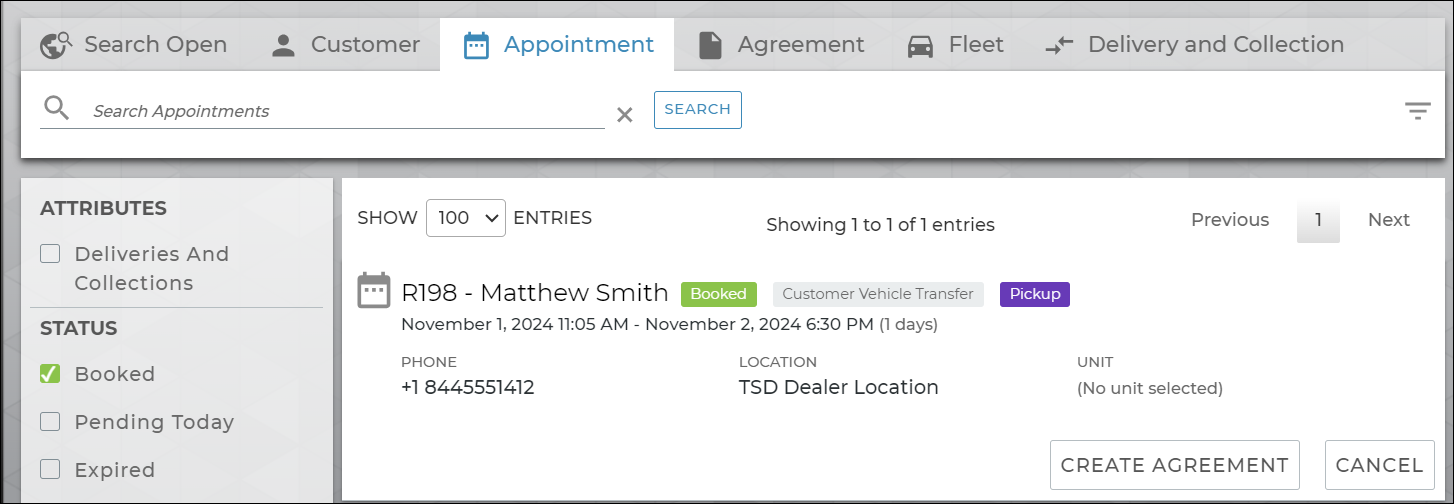
- In TSD DEALER, the booked appointment has a Customer Vehicle Transfer tag, as well as a Pickup tag, if marked for pickup. (This tag will be removed once the pickup trip starts, or after the appointment is opened into an agreement.) (If marked for return only, it has a Return tag that will be removed once the return trip starts.)
Hover to view the full-sized image.
Step 2. (Pickups) Start the trip: pick up the customer's automobile.
When it's time to pick up the customer's automobile for service, the driver can start the trip using the mobile app.
- On your 'Home' screen, tap Trips to view trips in which you are the assigned driver. (To view all other trips, tap the My Trips filter to clear it.)
- Tap the record to start the pickup trip.
- Use the Trip Checklist to toggle through each step of the CVT trip process:
- Pickup Now: Before you start your trip, notify the customer via email / text1 that you're on the way: "Hello [Customer Name], your driver [Pickup Driver Name] is on the way".
- Indicate Arrival: When you arrive at the destination, notify the customer via email / text that you've arrived: "Hello (First Name) (Last Name), your driver (Pickup Driver Name) has arrived.".
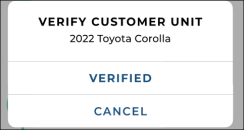
- Verify Customer Unit: Make sure you're picking up the correct vehicle for service. Make sure the Year, Make, and Model of the customer automobile associated with the appointment / agreement matches the actual vehicle. Tap Verified if it's the correct vehicle, or Cancel to return to the checklist without verifying the vehicle.
- Customer Unit Walkaround: Perform a walkaround inspection of the customer's vehicle. See "Inspect a Unit" for more information about mobile app inspections.
- Open Agreement: Officially open the CVT agreement from the CVT appointment, which changes the Incomplete status to Open, with the current date and time set as the Checkout Date / Time.
- Arrived at Dealership: When you've arrived back at the location, confirm your arrival to update the status of the trip, so it is no longer considered En Route.
Important Note: Keep your TSD mobile app open during the trip, if your location is using the Driver GPS Tracking component of the feature.
Hover to view the full-sized image.
Step 3. (Returns) Start the trip: return the customer's automobile.
After service on the customer's vehicle is complete and it's time to return the vehicle to the customer, the driver can start the trip using the mobile app.
- On your 'Home' screen, tap Trips to view trips in which you are the assigned driver. (To view all other trips, tap the My Trips filter to clear it.)
- Tap the record to start the pickup trip.
- Use the Trip Checklist to toggle through each step of the CVT trip process:
- Return Now: Before you start your trip, notify the customer via email / text2 that you're on the way. Send an email and/or text notification to the customer when the driver on the way: "Hello [Customer Name], your driver [Return Driver Name] is on the way".
- Indicate Arrival: When you arrive at the destination, notify the customer via email / text that you've arrived: "Hello (First Name) (Last Name), your driver (Return Driver Name) has arrived.".
- Verify Customer Unit: Make sure you're returning up the correct vehicle for service. Make sure the Year, Make, and Model of the customer automobile associated with the appointment / agreement matches the actual vehicle. Tap Verified if it's the correct vehicle, or Cancel to return to the checklist without verifying the vehicle.
- Customer Unit Walkaround: Perform a walkaround inspection of the customer's vehicle. See "Inspect a Unit" for more information about mobile app inspections.
- Return Agreement: Close the CVT agreement, which changes the Open status to Closed, with the current date and time set as the Return Date / Time.
- Arrived at Dealership: When you've arrived back at the location, confirm your arrival to update the status of the trip, so it is no longer considered En Route.
Important Note: Keep your TSD mobile app open during the trip, if your location is using the Driver GPS Tracking component of the feature.
Hover to view the full-sized image.
CVT Pickup and Return (Web)
Step 1. Book an appointment.
CVT appointments have Customer Automobile Only toggled on in the Delivery & Collection section, and contain pickup and/or return address information, driver(s), and driver departure time.
- Create an appointment on the web.
- In the Delivery & Collection section of the appointment, toggle on the Delivery Address and/or Collection Address toggles. This exposes Customer Automobile Only toggle.
- Turn on the Customer Automobile Only toggle. This updates the field labels from delivery / collection to pickup / return.
- Toggle on Pickup Address and/or Return Address, as needed, and fill in the address(es). (For pickup, you can select the Home check box to set the address to the customer's home address on the appointment, and for return, you can select either the Home or Pickup check box to set the return address.)
- (Optional.) Tap to view the estimated distance and travel time from your location to the customer's destination, as well view the route on a map ().
- For pickups, select a main Pickup Driver and additional chase Pickup Driver 2, if applicable. For returns, select a main Return Driver and additional chase Return Driver 2.
- For pickups, select the Pickup Driver Departure date and time. For returns, select the Return Driver Departure date and time.
- Complete and save the appointment.
Note: Note that mapping the route sets the driver departure dates / times to the Checkout / Return Date and Time, minus the travel time, by default.
A button is available to view scheduled trips for drivers on departure date (or today's date, if no date is selected), with the option to change the date to check availability for a different day.
Note: Pickup and return departure dates/times are set, by default, to the Checkout Date /Time and expected Return Date / Time, respectively. If the route is mapped (manually via or automatically, if applicable), they reflect the Checkout / Return Date/Time subtracted by the estimated travel time.
Hover to view the full-sized image.
What happens next?
- If you use Auto Texting and Emails for appointment notifications, an email and/or text confirmation is sent to the customer. If you also use Expedited Appointments, that email / text also includes a link to access the appointment form and submit information in advance.
- In TSD DEALER, the booked appointment has a Customer Vehicle Transfer tag, as well as a Pickup tag, if marked for pickup. (This tag will be removed once the pickup trip starts, or after the appointment is opened into an agreement.) (If marked for return only, it has a Return tag that will be removed once the return trip starts.)
Hover to view the full-sized image.
Step 2. Open the CVT agreement from the appointment.
CVT appointments and agreements have Customer Automobile Only toggled on in the Delivery & Collection section, and contain pickup and/or return address information, driver(s), and driver departure time.
- Pull up the appointment record and click .
- Verify the pickup and return information and update it, as needed:
- In the Delivery & Collection section of the appointment, toggle on the Delivery Address and/or Collection Address toggles. This exposes Customer Automobile Only toggle.
- Turn on the Customer Automobile Only toggle. This updates the field labels from delivery / collection to pickup / return.
- Toggle on Pickup Address and/or Return Address, as needed, and fill in the address(es). (For pickup, you can select the Home check box to set the address to the customer's home address on the appointment, and for return, you can select either the Home or Pickup check box to set the return address.)
- (Optional.) Tap to view the estimated distance and travel time from your location to the customer's destination, as well view the route on a map ().
- For pickups, select a main Pickup Driver and additional chase Pickup Driver 2, if applicable. For returns, select a main Return Driver and additional chase Return Driver 2.
- For pickups, select the Pickup Driver Departure date and time. For returns, select the Return Driver Departure date and time.
- Make sure the customer's automobile is selected on the agreement.
- Complete the rest of the agreement and tap .
Note: Note that mapping the route sets the driver departure dates / times to the Checkout / Return Date and Time, minus the travel time, by default.
A button is available to view scheduled trips for drivers on departure date (or today's date, if no date is selected), with the option to change the date to check availability for a different day.
Note: Pickup and return departure dates/times are set, by default, to the Checkout Date /Time and expected Return Date / Time, respectively. If the route is mapped (manually via or automatically, if applicable), they reflect the Checkout / Return Date/Time subtracted by the estimated travel time.
Hover to view the full-sized image.

Hover to view the full-sized image.
What happens next?
- If you use Auto Texting and Emails for agreement notifications, an email and/or text confirmation is sent to the customer.
- In TSD DEALER, the Open agreement has a Customer Vehicle Transfer tag, as well as a Pickup tag, if marked for pickup. (This tag will be removed once the pickup trip starts.) (If marked for return only, it has a Return tag that will be removed once the return trip starts.)
Step 3. (Pickups) Pick up the customer's vehicle for service.
When it's time to pick up the customer's automobile for service, you can arrange your driver to start that trip.
Step 4. (Returns) Return the customer's vehicle after service is completed.
After service on the customer's vehicle is complete and it's time to return the vehicle to the customer, you can arrange your driver to start that trip.
Step 5. Close the CVT agreement.
When the driver completes the return of the customer's vehicle, close the agreement using your normal process.
Related Features
The following features are available throughout the delivery and collection process.
Driver Tracking & Route Monitoring
Note: TSD must turn on the Driver GPS Tracking component to use the map portion of this feature. Contact your TSD Sales Representative at sales@tsdweb.com for more information.
Being able to view as much information as possible about the driver's route, including estimated travel distance and estimated arrival time, gives both you and your customers better visibility into the location and status of drivers and can help you organize deliveries and collections for the day.
Note: TSD must turn on the Driver GPS Tracking component to use this feature, and the driver must be using the mobile app. Contact your TSD Sales Representative at sales@tsdweb.com for more information.
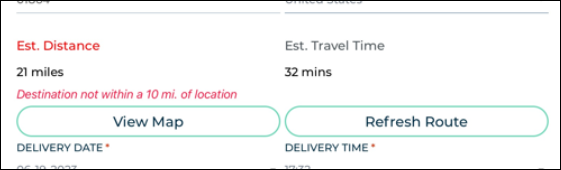
Set a Delivery and Collection Radius to limit the distance at which you are offering delivery and collection. It doesn't prevent you from delivering or collecting, but the application displays an informative message if the destination is outside of your radius.
When you view an agreement, the Est. Distance in miles from the location to the customer's destination is displayed, as well as the Est. Travel Time to get there.
Note: TSD must turn on the Driver GPS Tracking component to use this feature, and the driver must be using the mobile app (and have it open on the device, even if in the background). Contact your TSD Sales Representative at sales@tsdweb.com for more information.
As long as the driver has the mobile app open on his or her device, both you and your customers can track the driver's route on a map for the duration of the trip for complete visibility into driver's location and status. (Once a driver has completed the trip by indicating arrival back at the dealership (via the Arrived at Dealership toggle on the trip checklist), the URL to the map is no longer accessible; accessing it displays the following message: "Your Driver has Arrived.)
The map defaults to Satellite view, allows you to zoom in and out, and re-sizes to adapt to your device.
- For customers: A URL to the map is provided in the text or email sent to the customer as part of the Deliver Now or Collect Now notification (e.g., "Track the status of your delivery at [URL]" or "Track the status of your collection at [URL]"). This map is available until the driver indicates arrival at the customer's destination.
- For your location (on the mobile app): When you view an agreement, a View Map button is available to view the driver's route on a map, and a Refresh Route button is available to refresh the information based on the entered address. This map is available until the driver indicates arrival at the customer's destination.
- For your location (on the web): Use the Delivery and Collection Hub on the Home page to search for deliveries and collections that have a Driver Enoute substatus, and from your results, click the Driver Enroute status to bring up the map. This map is available until the driver indicates arrival at the customer's destination.
![]()
Hover to view the full-sized image.
![]()
Customer Automobile Inspections
This feature is only available for locations with the Enable Customer Automobile Inspections setting turned on within Delivery and Collection setup.
Customer automobile inspections allow you and the customer to address any concerns or issues about the condition of the customer's vehicle while it is in the possession of the dealership, therefore promoting customer satisfaction and ensure a transparent experience for both parties.
Customer automobile inspections can be performed during the delivery or collection by the driver using the mobile app trip checklist (with Record360 integration), or on the web application on the appointment or agreement.
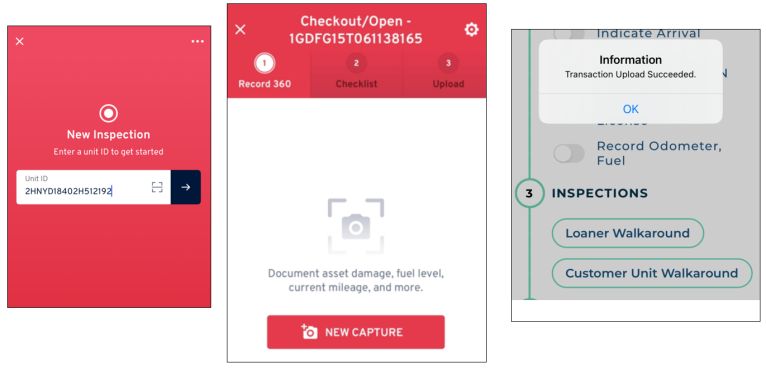
Delivery and Collection unit and customer inspections on the mobile app use Record360 integration, which lets you upload photos, videos, and notes to Record360. See "Record360 Integration" for more information.
Note: If your location doesn't have Record360 integration, a message is displayed: "Record 360 is required to create a Customer Automobile Inspection."
- On the mobile trip checklist during the delivery or collection, tap the Customer Unit Walkaround toggle to open the Record360 app.
- Enter the VIN of the automobile and continue to capture photos and videos of the customer's vehicle. When completed, you are returned to the app where a message is displayed if the transaction uploaded successfully.
- In the Add Customer Automobile section of the appointment or agreement, add or select a customer automobile to be serviced.
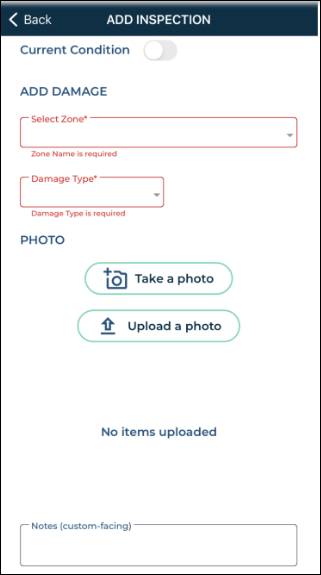
- Click to display the vehicle diagram and existing damage, if present.
- Select a location of damage on the diagram, or click .
- Select or confirm the area of damage (Zone) and select a Damage Type.
- Indicate whether the severity of the damage (general or chargeable).
- (Optional.) Upload a photo of the damage.
 Drag and drop an image to upload or click
  to select one.
- (Optional.) Add notes.
- Click . Verify the information and click .
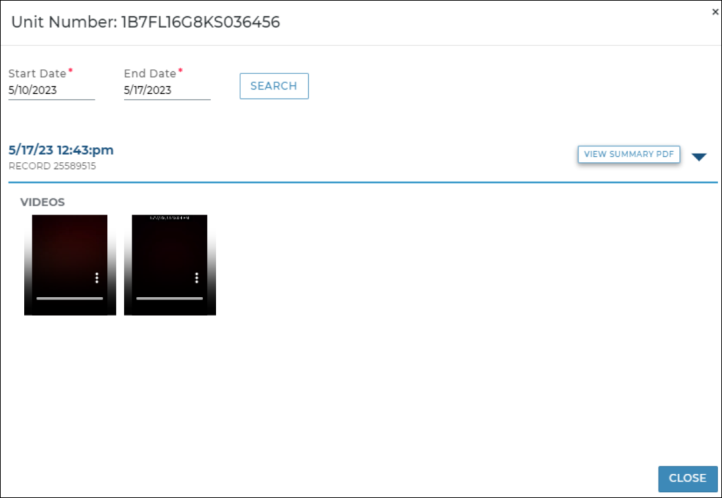
You can access inspection history (photos, videos, and notes) from Record360 for a customer automobile from the customer record.
- Search for and view the customer record from the Search or Customer tabs.
- In the Customer Automobile section, click next to the customer automobile.
- Update the Start Date and End Date range for which you want to view inspection history, if different from the default (past 7 days), and click .
- Click to expand an inspection record entered on a given date and time to view details, and click to view a summary of history as a PDF.
© 2026 TSD Rental, LLC